Your Rhythm Studio — Help & Reference
📱 Phone App
1. Quick Start Guide
New to Your Rhythm Studio? Here's how to record your first session in 6 steps:
- Put on the Polar H10 chest strap — moisten the electrode contacts and position it just below your chest muscles.
- Open the YourRhythm app — if you've previously paired a sensor and auto-connect is on (Settings → Sensor Configuration, on by default), it connects automatically and shows your live heart rate. On first launch, tap Scan for Sensors in Settings, select your Polar H10, and it will auto-connect from then on.
- Select an activity — tap the Activity dropdown (e.g. Resting, Walking, Running).
- Press START SESSION — the app begins recording ECG, heart rate, and detecting arrhythmias in real time.
- Press STOP when done — choose your export scope (Full Data or Events Only). The session is saved and ready to sync to the dashboard.
- Exit the app when finished — tap the ⋮ (three-dot) menu in the top-right corner and select Exit App. This properly disconnects the Polar H10 sensor and closes the app cleanly, so the next launch can reconnect without issues.
2. Recording a Session
The Monitor tab is where you start, stop, and manage live recordings.
Starting a Session
- Ensure the Polar H10 is connected (heart rate displayed on screen).
- Tap the Activity dropdown to select your activity type (e.g. Resting, Walking, Running, Gym).
- Press START SESSION. The ECG waveform and live metrics appear.
- Optional: Tap Flag Event to log a symptom or feeling. You can also double-tap the sensor to mark an event when getting your phone out isn't easy, such as while riding a bike.
Stopping a Session
- Press STOP SESSION. A confirmation dialog appears.
- Choose your export scope:
- Full Data — raw ECG + HR + all events (larger file, full analysis).
- Events Only — just detected anomalies with ECG snippets (compact, fast to load).
- Tap Confirm. The session is saved to the database and auto-exported.
Special Activity Modes
Certain activities trigger specialised measurement overlays automatically:
- HRV & RHR — starts a 60-second controlled measurement for resting HR and HRV. See Section 3.
- Cool Down — starts a 60-second heart rate recovery measurement. See Section 4.
- Meditation — opens the meditation duration and sound type picker. See Section 5.
- Sleeping — activates the sleep analysis pipeline (motion + HRV + respiratory rate).
3. Taking an HRV & RHR Measurement
Your morning HRV and resting heart rate are the most important baselines for tracking your cardiovascular health over time.
How to measure
- Put on the chest strap and open the app first thing in the morning, before getting out of bed or having coffee.
- Select the HRV & RHR activity from the Activity dropdown.
- A 60-second overlay appears with a countdown timer. Stay still and breathe normally.
- When the timer completes, your Resting HR and RMSSD (HRV) are saved automatically.
- These values are written to the
[SECTION:HEALTH_METRICS]section of every subsequent session export and displayed in the dashboard's Physiology card on the Summary tab.
For the science behind HRV, RMSSD, and why morning measurements matter, see The Science → HRV & RHR Baselines.
4. Measuring Heart Rate Recovery (Cool Down)
Heart Rate Recovery (HRR) shows how quickly your heart returns to baseline after exertion — a key indicator of cardiovascular fitness.
How to measure
- During or immediately after a hard effort (e.g. running, cycling), select the Cool Down activity from the Activity dropdown.
- The app records your current heart rate as your peak HR.
- A 60-second overlay appears with a countdown timer and live BPM display. Keep moving gently or stand still.
- When the timer completes, your recovery HR is recorded and the HRR percentage is calculated automatically.
- The result is saved in the session metadata and displayed in the dashboard's Spot Measurements card.
Auto Cool Down Detect (optional)
Enable Auto Cool Down Detect in Settings → Event Recording to start the HRR measurement without reaching for your phone. When enabled, two independent triggers are armed during a recording in an exertion activity (Cardio, Gym, Running, Walking, Vo2Max, Other):
1. Double-tap (immediate) — tap your chest strap twice to signal intent, then:
- Movement stops — the strap's accelerometer detects a dramatic drop in movement within ~10 seconds of the tap.
- Heart rate falls — your HR drops by ≥5 bpm within the same window, confirming physiological recovery has begun.
2. Passive (no tap needed) — if you simply stop moving during an exertion activity for about 10 seconds, the activity switches to Cool Down immediately. The trigger is self-correcting: if you start moving again within the confirmation window (a traffic-light stop or a rest between sets) the activity automatically reverts to what it was, and the trigger re-arms. If you stay still but your heart rate never falls by ≥15% of your heart-rate reserve (minimum 10 bpm) within ~75 seconds, it reverts too — so the feature assumes stopping during vigorous exercise means the effort is over. If your session is intentionally stop-and-start, switch to Cool Down manually instead.
If the tap-path conditions are met, or the passive path qualifies, the activity switches to Cool Down automatically and the 60-second HRR overlay starts immediately. You can still abort via the overlay's Abort button. If the movement or HR conditions aren't met (e.g. you tapped but kept moving), the tap is logged as a normal event instead.
Only one auto-trigger fires per session, so interval-training rest periods won't produce repeated prompts. The peak HR is captured from your live heart rate at the moment movement stops — close enough to your actual exercise cessation that the HRR percentage remains clinically faithful.
For the HRR formula and interpretation ranges, see The Science → Heart Rate Recovery.
5. Starting a Meditation Session
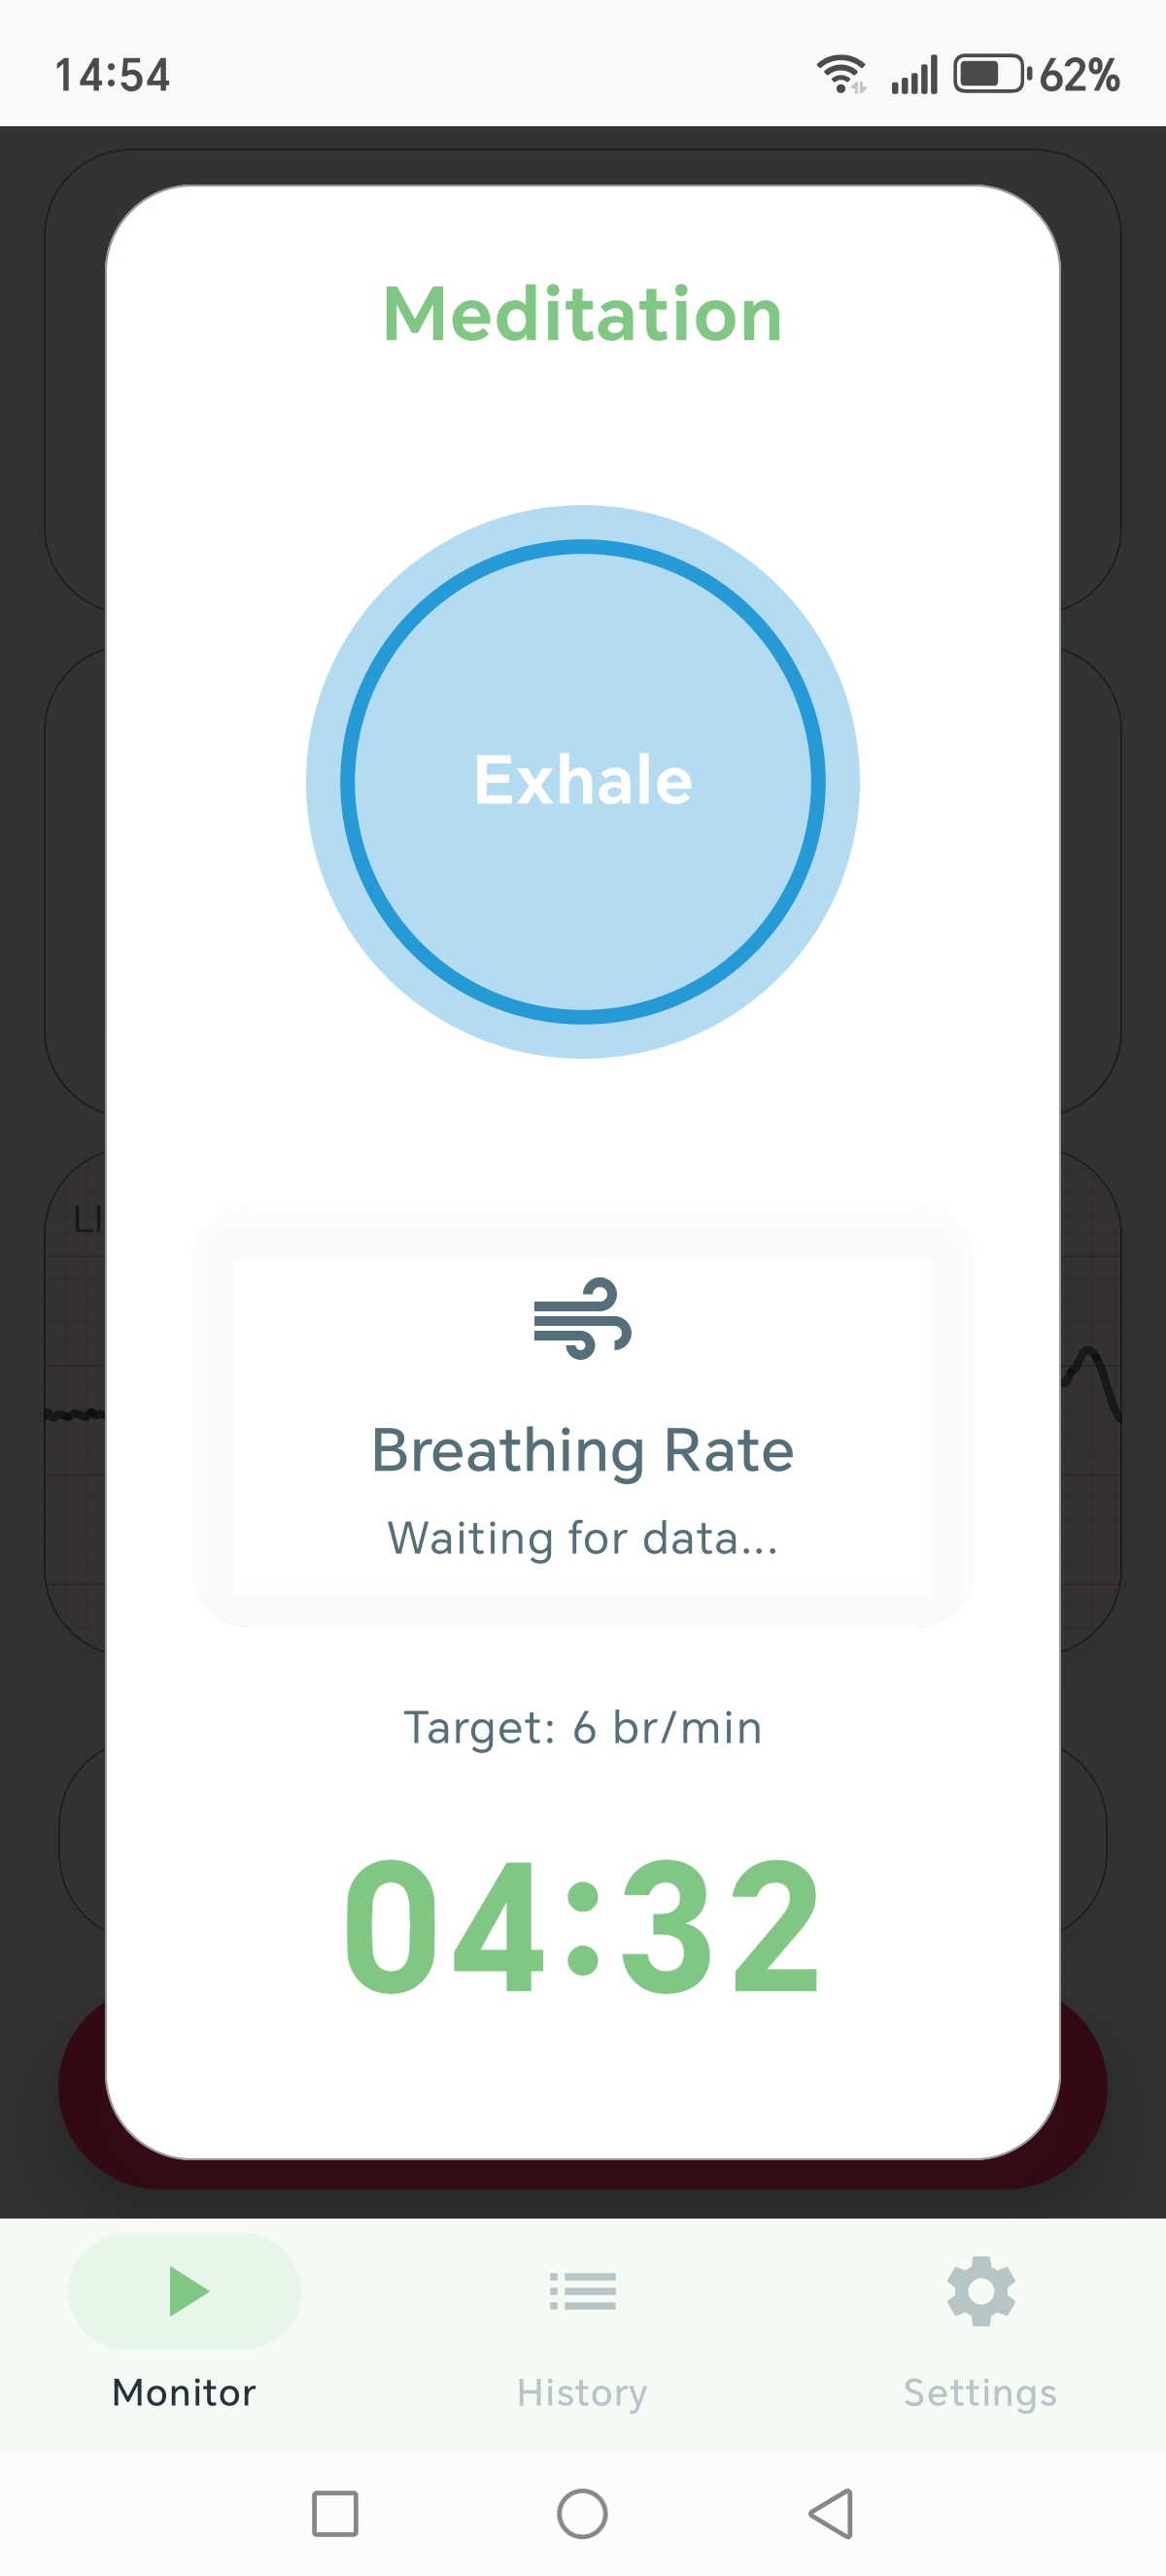
The Android app includes a physiology-driven soundscape engine: your chest strap's accelerometer tracks your breathing, your heart rate and beat-to-beat (RR) intervals measure heart–breath coupling, and a spatial audio renderer answers in real time. The goal is to actively improve your HRV by guiding your breathing toward a resonance frequency of about 6 breaths per minute — and the sound tells you when you get there.
How to start
- Open the Android app and select the Meditation activity from the Activity dropdown.
- A duration picker appears with a grouped soundscape dropdown. Choose a duration (1, 5, 15 minutes, or open-ended).
- Pick a soundscape — grouped by what drives the sound:
- Guided breathing — Resonance I–III (a shimmer that blooms when your heart & breath synchronise, at three difficulty levels) and Breath Shepherd (a guide tone that meets your breath and slows it toward ~6/min).
- Breath-reactive — Ocean Breath, Moonlit Shore, Expanding Space — the sound expands through space as you inhale and contracts as you exhale.
- Your heartbeat — Inner Pulse, Lub-Dub Heart, Endless Descent, Heart Keys — your pulse as taps, lub-dub pairs, a descending tone staircase, or an HRV melody.
- Brainwave tones — Theta Drift, Alpha Calm, Sleep Drift — binaural entrainment carriers (headphones recommended).
- Put on headphones if you have them — every soundscape is rendered on a 3D soundstage around your head, and the spatial effect (sound starting close in front of you and expanding outward with each breath) is mostly lost on the phone speaker.
- Press Start. The timer appears with live breathing rate feedback.
- During the session, use the sound dropdown to switch soundscapes at any time.
- Press Stop Session when done, or the abort control to cancel without saving.
For the science behind biofeedback and coherence training, see The Science → Biofeedback & Coherence.
How to Use Each Sound Mode
| Mode | Sound follows | Your goal | Cue for success |
|---|---|---|---|
| Resonance I–III | Heart–breath coupling (per-breath HR range) | Sustain synchrony at ~6 br/min | The shimmer blooms — and stays while you stay coupled |
| Breath Shepherd | Your real breathing rate, then a decelerating guide | Follow the guide down toward ~6 br/min | The sound leads; you follow it slower |
| Ocean Breath / Moonlit Shore / Expanding Space | Your breath phase (ACC) | Smooth, rolling breath cycles | Sound expands with the inhale, contracts on exhale |
| Inner Pulse / Lub-Dub Heart | Your live beats (RR intervals) | Awareness of your own rhythm | Taps / lub-dub pairs timed to each real beat |
| Endless Descent | Heartbeat-stepped tone staircase | Settle toward stillness | The tone descends one step per heartbeat |
| Heart Keys | Your HRV (RR variability) | Smooth, healthy variability | A pentatonic melody drifts with your beat-to-beat changes |
| Theta / Alpha / Sleep Drift | Fixed binaural carriers | Brainwave entrainment (headphones) | Steady detuned tones; Sleep Drift fades as you settle |
Resonance I–III — the flagship
A shimmer is hidden inside a quiet room ambience — and it only blooms when your heart and breath synchronise. The app measures the peak-to-peak swing of your heart rate within each breath (respiratory sinus arrhythmia, the same amplitude HRV biofeedback uses) and rewards coupling with sound: the stronger the synchrony, the brighter the shimmer. Three levels set how much coupling the reward demands — I is welcoming, II needs steady slow breathing, III only answers sustained resonance breathing around 6 br/min. Work your way up as the coupling becomes familiar.
Breath Shepherd
A guide tone that first meets your actual breathing rate, then gradually decelerates toward ~6 breaths per minute — it leads, you follow. If tracking is lost, the pacer waits for your breath to reappear rather than marching on without you.
Breath-reactive spaces
Ocean Breath, Moonlit Shore and Expanding Space put the soundscape in front of you: it starts close and narrow on the inhale, expands through 3D space as the breath peaks, then contracts and returns on the exhale. On headphones this reads as the world breathing with you.
Your heartbeat
Inner Pulse and Lub-Dub Heart play your real pulse — a tap or a lub-dub pair on every detected beat, preserving your true inter-beat timing. Endless Descent steps an endlessly falling tone one notch per heartbeat. Heart Keys turns your beat-to-beat variability into a pentatonic melody — the rises and falls you hear are literally your HRV.
Brainwave tones
Theta Drift, Alpha Calm and Sleep Drift are classic binaural entrainment — slightly detuned carriers per ear targeting theta/alpha/delta states (headphones recommended). Sleep Drift additionally fades itself to near-silence once your breathing settles into a sleep-like rhythm.
Reading the Meditation Tab Charts
The Meditation tab in the web dashboard shows several charts to help you understand your session:
- RMSSD / BPM / Breathing Rate chart (top) — Shows how your heart rate variability (RMSSD), heart rate (BPM), and breathing rate changed over the session. The dashed line at 6 br/min is the target breathing rate for resonance.
- RSA Amplitude chart (second) — Shows the amplitude of Respiratory Sinus Arrhythmia (the heart rate oscillation driven by breathing). Higher amplitude = stronger vagal tone = better coherence. The orange line shows cardio-respiratory coherence percentage (0–100%); aim for >50%.
- Breathing Waveform chart (third) — Shows the actual filtered respiratory signal at breath level. Each peak is the end of an inhale, each trough is the end of an exhale. Triangle markers show detected breath onsets. This lets you see individual breaths, breath-to-breath variability, and whether your breathing is smooth or irregular.
- Poincaré Plot (analytics card) — Plots each RR interval against the next one. SD1 (perpendicular spread) measures vagal tone — higher is better. SD2 (along the identity line) measures overall variability. The SD1/SD2 ratio indicates sympathovagal balance.
- Breathing Distribution (analytics card) — A histogram of your breathing rates during the session. The teal bars (5–7 br/min) are the resonance zone. The percentage shows how much time you spent in that zone.
Breathing Data: Epochs vs Waveform
The app records breathing data at two levels of detail:
- 30-second epochs — A summary breathing rate (breaths/min) computed every 30 seconds by fusing ECG-Derived Respiration (EDR) and accelerometer data. Used for trend lines, coherence scoring, and the breathing rate overlay on the main chart.
- Breathing waveform — The actual filtered respiratory signal sampled at 5 Hz, showing individual inhale/exhale cycles. Available in the Meditation and Sleep tabs, and as a "Breath Wave" overlay on the main chart (sleep/meditation sessions only). This lets you see breath-level detail: individual breaths, breath-to-breath variability, and phase timing.
- Breath cycles — Per-breath records with inhale duration, exhale duration, and amplitude. Shown as triangle markers on the breathing waveform chart.
Both levels are available for meditation and sleep activities. The waveform data is stored in the CSV export as [SECTION:BREATHING_WAVEFORM] and [SECTION:BREATH_CYCLES].
6. Running a VO2 Max Test
The Android app includes a guided submaximal VO2 max test for the treadmill. It pairs the Polar H10's precise heart rate and RR-interval data with the speed and incline you enter from the treadmill's console, then applies the ACSM metabolic equations to estimate your maximal oxygen uptake (VO2 max).
How to Run the Test
- Put on the Polar H10 chest strap and connect it to the app.
- Select the Vo2Max activity from the Activity dropdown (it's a protected activity, shown in cyan alongside Meditation and Sleeping).
- The parameter page appears. Set:
- Protocol — Walking, Running, or Auto (Auto picks the equation by speed: walking below 8 km/h, running at/above 8 km/h).
- Treadmill Speed — the speed you'll set on the treadmill (km/h).
- Incline — the treadmill grade (%).
- Steady-State Duration — how long the countdown will run (seconds, minimum 120). 300 (5 min) is a good default.
- Target HR Zone — the zone the coaching cues will guide you toward (Z1-Z5).
- Press Start Test. The guided page appears with a countdown timer.
- Get on the treadmill, set it to your planned speed and incline, and walk/run at a constant pace.
- Watch the coaching cue — it tells you to "Increase pace" or "Decrease pace" based on whether your live HR is below or above your target zone.
- When you've been at a steady pace for the full duration, the countdown reaches zero and the app auto-captures. You can also tap Capture Now early if you feel you've reached steady state.
- The machine values prompt appears. Confirm or adjust the speed and incline to match what the treadmill console actually showed (in case the knob was slightly off).
- Press Confirm. The app calculates your VO2 max and shows a completion flash with the estimate, range, and test parameters.
- Press Done. The session is saved and appears in History.
For the science behind the ACSM equations and estimation methods, see The Science → VO2 Max Metrics.
7. Phone App UI Reference
The interactive controls in the Your Rhythm Monitor Android app are grouped by screen below. The list is generated from phoneUiControls.json.
Monitor Tab — Session Controls
- START / STOP SESSIONSTART / STOP SESSION — Start / Stop Session ButtonBegins or ends a live ECG recording session. When starting, connects to the Polar H10 and begins streaming data. When stopping, shows a confirmation dialog with export scope options. Starts real-time ECG recording, heart rate monitoring, and arrhythmia detection. When stopping, saves the session to the database and optionally auto-exports.
- ActivityActivity — Activity SelectorOpens a dropdown menu to select the current activity type for the recording session. Sets the activity label for the current session, which is used for HRV validity, noise gating, and session organisation.
- Flag EventFlag Event — Flag Event ButtonOpens a dropdown menu to log a user-flagged event (symptom or feeling) at the current timestamp. Records a Uevent anomaly with the selected feeling label and captures an ECG snapshot.
Monitor Tab — Overlays & Dialogs
- Stop Session DialogStop Session Dialog — Stop Session ConfirmationDialog shown when stopping a session, with export scope choice (Full Data or Events Only) and confirm/cancel buttons. Choosing Full Data exports raw ECG + HR + events. Events Only exports just detected anomalies. Stop Session stops and saves; Continue Recording resumes.
- HRR MeasurementHRR Measurement — Heart Rate Recovery OverlayFull-screen overlay shown during the 60-second HRR measurement after selecting Cool Down activity. Displays countdown timer, start vs current BPM, and a live BPM chart. Abort button cancels the measurement.
- HRV MeasurementHRV Measurement — HRV & Resting HR OverlayFull-screen overlay shown during the 60-second HRV and RHR measurement after selecting HRV & RHR activity. Displays countdown timer and instructions to stay still. Abort button cancels the measurement.
- BLE StuckBLE Stuck — Bluetooth Connection Stuck DialogAlert dialog shown when the BLE GATT stack is corrupted and cannot recover automatically. Offers to open Android Bluetooth Settings to toggle BLE off/on, or dismiss the warning.
- Sensor In UseSensor In Use — Sensor In Use By Another App DialogAlert dialog shown when the Polar H10 is already connected to another app (e.g. Polar Flow or Polar's ECG Analysis app). The H10 only supports one Bluetooth connection at a time. Offers 'Open App Settings' to force-stop the conflicting Polar app, or Dismiss to close the warning.
- ProcessingProcessing — Session Processing OverlayFull-screen overlay with spinner shown briefly while session data is being saved after stopping. Blocks interaction until session processing and database writes are complete.
Monitor Tab — Meditation Overlay
- Meditation DurationMeditation Duration — Meditation Duration & Sound PickerOverlay shown when the Meditation activity is selected, offering sound preset selection, a 3D Motion slider, and duration choices. Choose a sound preset from the dropdown, adjust 3D Motion intensity, then pick a duration: 1 minute, 5 minutes, 15 minutes, or Open (manual stop).
- Sound TypeSound Type — Meditation Sound Preset SelectorDropdown to select the meditation soundscape preset, grouped by category: Guided (e.g. Breath Shepherd, Resonance I–III), Breath (Ocean Breath, Moonlit Shore, Expanding Space), Heart (Inner Pulse, Endless Descent, Lub-Dub Heart, Heart Keys), and Binaural (Theta Drift, Alpha Calm, Sleep Drift). Changes the real-time audio feedback loop used to guide breathing toward ~6 breaths per minute.
- 3D Motion3D Motion — 3D Motion SliderSlider (0–100%) that scales the spatial movement range of the meditation soundscape. Adjusts every preset's 3D movement in real time — available in the picker before starting and live during the session.
- Meditation SessionMeditation Session — Active Meditation SessionFull-screen overlay with countdown or elapsed timer, live heart rate, breathing rate and 6 br/min target, sound selector, preset description, and 3D Motion slider. START begins the session once sensor data is flowing; STOP SESSION ends and saves; Cancel exits before starting.
- Meditation CompleteMeditation Complete — Meditation Completion FlashCompletion flash shown when a meditation session ends and is saved. Displays 'Session saved' with the session's average heart rate and final RMSSD.
Monitor Tab — VO2 Max Test
- VO2 Max SetupVO2 Max Setup — VO2 Max Parameter PageParameter page shown when the Vo2Max activity is selected. Configure the protocol (Walking / Running / Auto), speed (km/h), incline (%), steady-state duration (2–15 min), and target HR zone (Z1–Z5). Shows your profile summary (age, weight, RHR, max HR, sex). Start Test begins the guided treadmill test; Cancel returns without starting.
- Guided TestGuided Test — VO2 Max Guided Test OverlayLive overlay during the test showing current heart rate, remaining and elapsed time, and a pace coaching cue (Increase pace / Decrease pace / In target zone). The test auto-captures when the countdown finishes. Capture Now ends early and records the steady-state HR; Abort cancels the test.
- Machine ValuesMachine Values — Confirm Machine Values PromptPrompt shown after capture to confirm the speed and incline the treadmill console actually displayed. Confirm computes the VO2 max estimate; Abort discards the test.
- Test CompleteTest Complete — VO2 Max Completion FlashCompletion flash showing the VO2 max estimate, extrapolation range, protocol, speed, incline, steady-state HR, and ACSM stage VO2. Done saves the session; it appears in History.
More Tab
- Bluetooth ConnectBluetooth Connect — Bluetooth Connect SwitchSwitch that controls whether the app automatically connects to your saved sensor. Enables or disables automatic sensor connection on launch.
- Wi-Fi ServerWi-Fi Server — Wi-Fi Server SwitchSwitch that starts or stops the phone's local web server hosting the Cardio Dashboard. When running, the dashboard is reachable at http://
:8080 from any device on the same Wi-Fi network. Only visible once the phone holds a licence. - Dashboard URLDashboard URL — Dashboard URL Row & DialogShows the dashboard URL (http://
:8080/dashboard.html). Tap to open a dialog with Copy and Email actions. Copy puts the URL on the clipboard; Email opens the Android share sheet to send it. - Get Web DashboardGet Web Dashboard — Get Web Dashboard RowOpens the licence page on the YourRhythm website in the browser to purchase a licence (£8 one-time). Only visible before the phone is licensed.
- Activate LicenceActivate Licence — Activate Licence Row & DialogOpens a dialog to paste the licence key from the purchase email. The key is validated online and the certificate stored on the phone — Wi-Fi Server, Dashboard URL and dashboard access unlock immediately. Only visible before the phone is licensed.
- Your Rhythm WebsiteYour Rhythm Website — Your Rhythm Website LinkOpens the Your Rhythm Studio website in the phone's browser. Launches an Intent to open the Cardio Dashboard web app site.
- AboutAbout — About DialogOpens a dialog showing app version, build info, and credits. Displays the About popup with app information.
- ExitExit — Exit ButtonButton in the More tab header that disconnects the sensor, stops the monitoring service, releases BLE resources, and exits the app. Cleanly shuts down the app and kills the process.
More Tab — Debug
- Export / Share Debug LogExport / Share Debug Log — Export Debug Log RowExports the app's debug log file to Documents and offers to share it via Android share sheet. Copies the persistent debug log to external storage and opens the share dialog.
- Export DatabaseExport Database — Export Database RowExports the app's SQLite database to Documents/YourRhythm-Data for external analysis. Copies the full database file to external storage accessible via USB/MTP.
- Clear Debug LogClear Debug Log — Clear Debug Log RowClears the persistent debug log file. Empties the debug log file in the app's private storage.
- Clear Local DatabaseClear Local Database — Clear Local Database RowDeletes the app's local SQLite database, removing all recorded sessions and events. Closes and deletes the database on a background thread, then shows a confirmation toast.
Settings — User Profile
- User IDUser ID — User ID InputText field for the user's identifier, stored with session data. Auto-saves on change. Setting it to "bug" reveals the hidden DEBUG section on the More tab.
- AgeAge — Age InputNumeric text field for the user's age, used to calculate maximum heart rate and training zones. Auto-saves on change. Recalculates HR zone defaults if age changes.
- WeightWeight — Weight InputNumeric text field for the user's weight in kilograms. Auto-saves on change with a 500ms debounce.
- HeightHeight — Height InputNumeric text field for the user's height in centimetres. Auto-saves on change. Stored with the user profile.
- Resting HRResting HR — Resting Heart Rate InputNumeric text field for manual entry of resting heart rate. Auto-measured when running the HRV & RHR activity. Auto-saves on change. Used for HR zone calculation and HRV analysis context.
- SexSex — Sex SelectorFilter chips to select Male or Female for the user's biological sex. Auto-saves instantly on selection.
Settings — Sensor Configuration
- Sensor IDSensor ID — Polar Sensor ID InputText field for entering the Polar H10 device ID manually, or it is auto-filled when a sensor is selected from scan results. Auto-saves on change. Used to connect to the sensor on app launch.
- SCAN FOR SENSORSSCAN FOR SENSORS — Scan / Stop Scan ButtonStarts a Bluetooth scan for nearby Polar devices. Toggles to STOP SCANNING while active. Populates a list of discovered sensors. Tap a result to select it as the active sensor.
- Sensor ResultSensor Result — Scanned Sensor ItemTap a discovered sensor from the scan results list to set it as the active sensor. Saves the sensor ID and name for auto-connect on next app launch.
Settings — Heart Rate Zones
- Zone BPMZone BPM — Zone Boundary Inputs (Z1–Z5)Ten numeric text fields defining the min/max BPM boundaries for each of the 5 heart rate zones. Auto-saves when any zone value differs from the defaults. Used for live zone display and post-session analysis.
Settings — Alerts
- High HR AlertHigh HR Alert — High Heart Rate AlertNumeric text field for the upper heart rate alert threshold in BPM. Triggers a warning if heart rate exceeds this value during a session.
- Low HR AlertLow HR Alert — Low Heart Rate AlertNumeric text field for the lower heart rate alert threshold in BPM. Triggers a warning if heart rate drops below this value during a session.
Settings — Event Recording
- Forgot to Record WarningForgot to Record Warning — Forgot to Record Warning SwitchToggle switch that vibrates 3 quick pings if connected to a sensor for 30 seconds without starting a session. Enables or disables the reminder vibration when idle but connected.
- Warn of EventWarn of Event — Warn of Event SwitchToggle switch that controls vibration alerts for detected events (PVC, PAC, AFib, Bradycardia, Pause). When OFF, detection still runs and events are recorded silently — only the vibration is suppressed. ECG data is always recorded.
- Auto Cool Down DetectAuto Cool Down Detect — Auto Cool Down Detect SwitchToggle enabling the auto cool-down triggers during an exertion activity: double-tap the sensor (movement must stop and heart rate begin falling within ~10 seconds), or simply stop moving ~10s — the passive path switches to Cool Down and auto-reverts if you start moving again or your heart rate never confirms the drop. Either starts the Cool Down (HRR) measurement automatically; a failed tap falls back to event logging.
Settings — Custom Activities
- Add ActivityAdd Activity — Add Custom ActivityText field and Add button to create a new custom activity type for the activity selector dropdown. Adds the new activity to the user activities list and makes it available in the Monitor tab dropdown.
- Remove ActivityRemove Activity — Remove Custom ActivityTap the X icon next to a custom activity to remove it from the list. Removes the activity from the user activities list and Monitor tab dropdown.
Settings — Custom Feelings
- Add FeelingAdd Feeling — Add Custom Feeling / SymptomText field and Add button to create a new custom feeling or symptom for the Flag Event dropdown. Adds the new feeling to the user feelings list and makes it available in the Monitor tab Flag Event menu.
- Remove FeelingRemove Feeling — Remove Custom FeelingTap the X icon next to a custom feeling to remove it from the list. Removes the feeling from the user feelings list and Flag Event menu.
Settings — Export
- Export ScopeExport Scope — Export Scope ChipsFilter chips to select whether session exports include All Data (raw HR + ECG + events) or Events Only (just detected anomalies). Controls the default export scope for auto-export on session stop and manual exports.
Settings — Appearance & On App Start
- Night ModeNight Mode — Night Mode Switch (APPEARANCE card)Switch that toggles between day (light) and night (dark) themes. Immediately switches the app's colour scheme.
- Bluetooth ConnectBluetooth Connect — On App Start SwitchSets the default for when the app opens: automatically connect to your saved sensor. The live Bluetooth Connect switch on the More tab writes the same setting.
- Wi-Fi ServerWi-Fi Server — On App Start SwitchSets the default for when the app opens: start the Wi-Fi server automatically. Only visible once the phone holds a licence — the server never auto-starts on an unlicensed phone.
History — Session List
- Month HeaderMonth Header — Expandable Month HeaderTap to expand or collapse the sessions within a month, showing the session count. Toggles the visibility of session cards within that month.
- Session CardSession Card — Session ItemTap a session card to open the Session Report. Swipe right to reveal the delete confirmation dialog. Opens the Session Report with full analysis, or prompts to delete the session.
- Delete SessionDelete Session — Delete Session DialogConfirmation dialog shown when swiping a session card. Delete permanently removes the session and all its events. Deletes the session and all associated anomalies from the database.
- CLEAR ALL HISTORYCLEAR ALL HISTORY — Clear All History ButtonRed button at the bottom of the session list that deletes all recorded sessions. Shows a 'Clear All History?' confirmation dialog; Delete All removes every session and its events.
Session Report — Header & Overflow
- BackBack — Back ButtonReturns to the History screen. Navigates back to the session list.
- More OptionsMore Options — Overflow Menu (⋮)Dropdown menu with Share Session Report, Submit for Review, and Delete Session options. Opens the share format dialog, the review submission dialog, or the delete confirmation dialog.
- Share Session ReportShare Session Report — Share Format DialogDialog to choose export format: CSV (raw data + events) or PDF (formatted report). Includes radio buttons and Share/Cancel buttons. Generates the selected format and opens the Android share sheet with the file.
- Submit for ReviewSubmit for Review — Submit for Review DialogDialog to flag the session for detection-pipeline review. Choose a feedback type — Missed Event, False Alarm, or General — and add an optional note. Records the feedback as a session note, generates a CSV report, and opens the email share sheet pre-addressed to the YourRhythm review inbox.
- Delete SessionDelete Session — Delete Session DialogConfirmation dialog to permanently delete the session and all its data. Deletes the session from the database and returns to History.
Session Report — Analysis & Events
- Run Full AnalysisRun Full Analysis — Run Full Analysis ButtonButton that triggers rhythm classification, HRV analysis, Poincaré plot, and tachogram generation for the session. Runs the full analysis pipeline and populates the rhythm diagnosis, conditions detected, and charts.
- Anomaly ItemAnomaly Item — Anomaly / Event ItemTap an anomaly in the Conditions Detected list to open the ECG Event Viewer for that event. Opens the full-screen ECG snapshot viewer with the event's waveform and classification.
- Condition InfoCondition Info — Condition Description PopupTap a detected condition name to see a plain-language description of that arrhythmia. Opens an AlertDialog with the condition title and description text.
ECG Event Viewer
- BackBack — Back ButtonCloses the ECG Event Viewer and returns to the Session Report. Dismisses the viewer dialog.
- DeleteDelete — Delete Event ButtonDeletes the currently displayed anomaly/event from the database. Removes the anomaly and closes the viewer.
- PREVIOUSPREVIOUS — Previous Event ButtonNavigates to the previous ECG snapshot in the session's event carousel. Loads the preceding anomaly's ECG waveform and metadata.
- NEXTNEXT — Next Event ButtonNavigates to the next ECG snapshot in the session's event carousel. Loads the following anomaly's ECG waveform and metadata.
- Pinch / PanPinch / Pan — Pinch-to-Zoom & Pan GestureTwo-finger pinch to zoom and single-finger drag to pan the ECG waveform within the viewer. Scales the waveform between 0.5x and 10x and pans horizontally/vertically.
- Feeling ChipFeeling Chip — Feeling Annotation ChipsTappable chips to annotate a user-flagged event with a feeling label (e.g. Chest Pain, Palpitations). Only shown for Uevent types. Updates the anomaly type to 'Uevent:
' and saves to database.
Onboarding
- NextNext — Next ButtonAdvances to the next onboarding page (Welcome, Wear Your Sensor, Connect & Record, The Desktop Dashboard). Shows the next page with its icon, title, and description.
- SkipSkip — Skip ButtonSkips the onboarding flow and proceeds to the Connect Sensor screen. Exits onboarding and moves to first-run sensor setup.
- Get StartedGet Started — Get Started ButtonFinal onboarding button that exits the onboarding flow and opens the Connect Sensor screen. Marks onboarding complete and moves to first-run sensor setup.
Connect Sensor (First Run)
- Grant PermissionsGrant Permissions — Grant Permissions ButtonButton shown on the first-run Connect Sensor screen when Bluetooth/Location permissions are missing. Launches the Android permission request for Bluetooth scan/connect, location, and notifications.
- RescanRescan — Rescan ButtonRestarts the BLE scan for nearby Polar devices. Repopulates the Devices Found list.
- Device ResultDevice Result — Scanned Device ItemTap a discovered Polar device — shown with name, device ID, and signal strength (dBm) — to select it. Stops scanning, saves the sensor, and navigates to the Monitor tab.
- Do LaterDo Later — Do Later ButtonSkips sensor setup and goes straight to the app. Opens the dashboard without connecting; you can scan later from Settings.
💻 Web Dashboard
7. Reviewing a Session on the Dashboard
Once you've loaded a session into the Cardio Dashboard, here's how to explore and interpret the results:
Loading a Session
- Open the Sessions panel in the left sidebar.
- Click any session card to load it into the dashboard.
- The Summary tab opens first, showing key metrics: duration, event counts, HR stats, HRV, and the rhythm diagnosis.
http://<phone-ip>:8080 (non-secure context), the folder picker is unavailable, so each selected session is downloaded as an individual CSV file to your browser's Downloads folder instead.
Navigating the ECG
- Switch to the Charts tab to see the full ECG waveform.
- Use the segment toolbar at the top to jump between 10-minute segments (00:00, 10:00, 20:00…).
- Use the mouse wheel to zoom in and out on the chart. The chart auto-switches between envelope view (zoomed out) and individual samples (zoomed in). The segment toolbar has RESET and AUTO-Y buttons to reset the view and toggle automatic Y-axis scaling.
- Use the Event Navigation Bar on the right side to jump to detected events (see Section 9).
Reading the Summary
- The Narrative Summary card at the top provides a plain-language overview of the session's key findings.
- The Physiology card shows your Resting HR and Measured HRV with status indicators.
- The HR Spark card displays a mini heart-rate trend chart with average, min, and max BPM.
- The Zones card shows time spent in each heart-rate training zone.
- The Data Quality card reports signal quality, noise percentage, and coverage.
- The Insights card highlights notable patterns (e.g. high noise, ectopic burden, activity context).
- The Clinical Findings card lists each detected arrhythmia type with its event count.
- The Activity & Intensity card breaks down time spent in each activity label.
Exploring Other Tabs
After the Summary tab, switch between these tabs depending on what you want to see:
- Charts — the full interactive ECG waveform with overlays (see below).
- Metrics — all 99 health metrics with reliability grade badges (A–D). Each metric has a checkbox — check a metric to make it appear in the Trends tab, uncheck to hide it. Use Check All / Uncheck All to bulk-toggle. See Section 18 for the grading system.
- HRV — appears for sessions with HRV & RHR, Meditation, or Sleeping activities. Shows all three HRV domains (time domain, Poincaré plot, frequency domain) in one place with visual charts and good/bad reference range indicators on every metric. Thresholds are age-adjusted when age is available from session metadata.
- Sleep — appears automatically for sleep sessions. Shows sleep stage analysis, overnight HRV, breathing patterns, and movement detection.
- Meditation — appears automatically for meditation sessions. Shows meditation playback, RSA amplitude, breathing waveform, and Poincaré plot.
Using the Viz-Bar Toggles
The vertical button bar on the right side of the chart lets you toggle overlays and layout options. The left side shows data overlays (only available when the session contains that data type); the right side shows layout controls:
- ECG — the raw ECG electrical signal (green trace)
- BPM — heart rate trace (red)
- HRV — HRV (RMSSD) trend (green)
- Motion — accelerometer magnitude (orange)
- Events — vertical markers for detected arrhythmias (yellow)
- Activity — coloured background bands for activity types (purple)
- Breathing — breathing rate trend derived from RSA (red-orange)
- Smooth — apply smoothing filter to the ECG trace
- PQRST — PQRST annotation markers on the waveform (pink)
- Grid — clinical ECG calibration grid (orange)
- Split — switch between single and split-panel layouts
- HUD — floating heads-up display with real-time stats
- Hover — detailed hover labels with precise values and timestamps
For the full list of dashboard controls, see Section 12: UI Controls Reference.
8. Reading the ECG Chart
Trace Colours by Rhythm
| Colour | Label | Meaning |
|---|---|---|
| ■ | Normal | Normal sinus rhythm |
| ■ | AFIB | Atrial fibrillation — irregular R-R, absent P-waves |
| ■ | VT | Ventricular tachycardia |
| ■ | PVC | Premature ventricular contraction — wide, bizarre QRS, arrives early |
| ■ | PAC | Premature atrial contraction — normal-shaped QRS but arrives early |
| ■ | Ectopic | Generic premature beat (low-confidence PVC/PAC classification) |
Overview Envelope
When viewing a full session or a 10-minute segment at full zoom-out, the chart switches from individual samples to an envelope view — a shaded band showing the signal's min/max range per time bin. This preserves performance for long recordings while still showing overall signal quality and events.
The envelope automatically switches back to individual ECG samples when you zoom in to less than ~1 minute (60 seconds) of data.
9. Event Navigation
The Event Navigation Bar appears at the right side of the segment toolbar. Each button corresponds to a detected or user-marked event in the session.
- Click once — Jumps to the first occurrence and zooms in to ~10 seconds of ECG
- Click again — Cycles to the next occurrence of the same event type
- After the last occurrence it wraps back to the first
10. Activity Tracking
Activity labels are sourced from the activity column in your recording CSV. The default activity labels in the phone app are: Resting, Walking, Running, Cardio, Gym, HRV & RHR, Cool Down, Sitting, Sleeping, Driving, Meditation, Vo2Max, Other. You can customise this list in the phone app's Settings, though protected activities (HRV & RHR, Cool Down, Sleeping, Meditation, Vo2Max) cannot be removed.
Activity regions appear as labelled, coloured panels in the Activity bar at the bottom of the chart. Toggle with the Activity button in the viz-bar.
Activity context is also used internally by the HRV engine — periods where mean BPM exceeds 100 are detected as exercise and marked as unreliable in the HRV trend (excluded from resting HRV calculations), since elevated heart rate from exertion does not reflect true autonomic tone.
11. Exporting from Dashboard
The Export panel in the left sidebar lets you create two outputs for any loaded session: a formatted clinical PDF report and a lightweight raw CSV. Use the PDF when you want a professional, human-readable summary; use the CSV when you only need the basic session metadata.
Before You Export
- Load a session from the Sessions panel.
- Review the Session Summary on the Dashboard tab. The PDF pulls its clinical findings from the summary narrative, so make sure it reflects what you want to share.
- If any events look wrong, use the Re-Classify option in the Analysis panel first. The PDF exports the current view, not a fresh analysis.
Export a Clinical PDF
- Click the Export button in the left sidebar to open the Export panel.
- Click Export as PDF. A new PDF Preview tab opens with the formatted report.
- Review the report contents:
- Section 1: Session Information - date, duration, detected event count, user event count
- Section 2: Rhythm Diagnosis - overall rhythm classification (e.g. Normal Sinus Rhythm, AFIB)
- Section 3: Heart Rate Statistics - average, minimum, and maximum BPM, plus ectopic count
- Section 4: HRV Metrics - RMSSD, SDNN, and pNN50 values (when available)
- Section 5: Event Type Breakdown - count of each detected event type (PVC, PAC, AFIB, etc.)
- Section 6: Clinical Findings Summary - narrative summary and tally of detected arrhythmias
- Section 7: ECG Event Segments - 10-second ECG strips (5 s before and 5 s after each event), labelled with event type, timestamp and RR interval
- Click Save PDF to download the file, or Print to send it directly to a printer. The file is named
<session-name>_clinical_report.pdf. - Click Discard or close the tab when you are done. No file is saved unless you choose Save PDF or Print.
Export Raw CSV Data
- Click the Export button in the left sidebar.
- Click Export Raw CSV. A small CSV file downloads immediately, named
<session-name>_raw.csv. - The CSV contains one row per session: session name, date, duration in minutes, sample rate, patient ID, device and start time. It does not include the full raw ECG waveform.
Export Trends PDF
- Click the Export button in the left sidebar to open the Export panel.
- Click Export Trends PDF. If the Trends tab is not currently open, you'll be asked whether to open it now — choose OK to load the trends log (this also picks up any newly added sessions).
- The currently visible page of the trends table is downloaded as
trends_YYYY-MM-DD.pdf, with category headers, metric labels, grade badges and session date columns. Only metrics you've checked in the Metrics tab are included. The sparkline column is omitted from the PDF. - If the trends log is empty, you'll see a "No trends data to export." message. Add sessions to the trends log from the Trends tab first.
What Each Export Is Useful For
| Export | Best for | Contains | Does not contain |
|---|---|---|---|
| Clinical PDF | Sharing with a clinician, coach or keeping a human-readable record | Session summary, narrative, ECG strips for every detected event | Full raw ECG data |
| Raw CSV | Importing into a spreadsheet or electronic record | Basic session metadata | Clinical narrative or ECG waveforms |
| Trends PDF (Export panel) | Long-term tracking across many sessions | Structured table with aggregated HR, HRV and event counts for the visible page | Individual ECG event strips, sparkline trend lines |
12. UI Controls Reference
The interactive controls in the dashboard are grouped below. The list is generated from uiControls.json.
App Header
- A-A- — Small fontDecreases the application-wide font scale by 15%. All text becomes smaller for a denser layout.
- AA — Normal fontResets the application-wide font scale to the default size. Restores the standard font size and spacing.
- A+A+ — Large fontIncreases the application-wide font scale by 15%. All text becomes larger for improved readability.
- Theme — Toggle light/dark themeSwitches the dashboard between the light and dark colour schemes. The entire interface, chart and tooltips change theme.
- BreadcrumbBreadcrumb — Current sessionShows the name of the session currently open. Updates when you open or switch sessions.
- BuildBuild — Build versionThe dashboard build number currently running. Informational only — helps when reporting issues.
- Load timerLoad timer — Session load timeShows how long the current session took to load and render. Informational only — resets on each session load.
- MemoryMemory — Memory usageLive JavaScript heap memory used by the dashboard. Informational only — grows with long sessions and many open tabs.
Sidebar
- SetupSetup — Setup panelOpens the data-source setup panel to choose phone or PC and connect. Reveals the Setup flyout for phone connection and folder selection.
- SessionsSessions — Sessions panelOpens the sessions list with sort, filter and review options. Reveals the Sessions flyout and the session grid.
- AnalysisAnalysis — Analysis panelOpens the analysis panel for AI summaries, re-classification and independent analysis. Reveals the Analysis flyout with model controls and LLM settings.
- TipsTips — Toggle tooltipsTurns the hover tooltips on or off for dashboard controls. When active, tooltips appear on hover; when off, they are suppressed.
- TrendsTrends — Trends tabOpens the longitudinal trends tab for multiple sessions. Switches the main view to the Trends tab for trend charts.
- MetricsMetrics — Metrics tabOpens the health metrics tab with reliability-graded metric cards. Switches the main view to the Metrics tab.
- HRVHRV — HRV tabOpens the heart-rate-variability analysis tab for the current session. Switches the main view to the HRV tab.
- ExportExport — Export panelOpens the export panel for PDF reports and raw CSV downloads. Reveals the Export flyout with PDF and CSV buttons.
- HelpHelp — Help pageOpens the standalone help page in the same tab. Navigates to help.html.
- HomeHome — Home pageOpens the home page in the same tab. Navigates to index.html.
- Desktop IconDesktop Icon — Add desktop iconCreates a desktop shortcut that opens this dashboard. Downloads a setup file or shows install instructions.
- CloseClose — Close appCloses the dashboard window. Only visible when running as an installed app (PWA).
Setup Panel
- Phone IP input — Phone IP addressEnter the IP address shown in the phone app's Server Info. Provides the address the dashboard uses to connect to the phone.
- ConnectConnect — Connect to phoneInitiates the Wi-Fi connection to the phone app. Lists available sessions on the phone and enables downloading.
- YesYes — Transfer to PCChooses to download sessions from the phone to this PC. Sessions are copied to YourRhythm-Data and removed from the phone.
- NoNo — Stream from phoneChooses to load sessions directly from the phone without copying. Sessions are loaded from the phone's storage over Wi-Fi.
- AcceptAccept — Accept setupConfirms the current setup and applies the data source. Applies the chosen source and closes the setup panel.
Sessions Panel
- ReloadReload — Reload sessionsRefreshes the session grid from the current source. Re-scans the selected folder or phone for sessions.
- Sort — Sort sessionsChoose the order in which session cards are displayed. Reorders the session grid by date, duration or event count.
- Filter — Filter sessionsLimits the session grid to sessions matching the selected criteria. Shows only all, phone, PC, sleep, non-sleep, with or without events.
- ✓Hide reviewedHide reviewed — Hide reviewed sessionsHides session cards that have already been marked reviewed. Reduces the grid to sessions that still need review.
- ViewView — View modeNormal mode where clicking a session card opens it. Session cards open their dashboard when clicked.
- ManageManage — Manage modeSwitches to selection mode for batch operations. Session cards show checkboxes; clicking selects instead of opening.
- N selectedN selected — Selection countShows how many sessions are currently selected in manage mode. Updates as you select or deselect session cards.
- Select AllSelect All — Select all sessionsSelects every session currently visible in the grid. Marks all listed sessions for a batch action.
- Copy to ArchiveCopy to Archive — Copy selected to archiveDownloads the selected sessions as CSV files to this PC. Each selected session is saved as an individual download (or into a chosen folder where supported).
- Delete SelectedDelete Selected — Delete selected sessionsPermanently deletes the selected sessions. Removes the chosen session files — this cannot be undone.
- SelectSelect — Select sessionMarks this session for a batch operation. Adds or removes the session from the current selection.
- Session cardSession card — SessionA recorded session. Click to open its dashboard. Opens the session in the main view.
- Show moreShow more — Show more sessionsLoads the next page of sessions into the grid. Appends more session cards below the current list.
- SourceSource — Session sourceShows where the listed sessions are coming from (e.g. phone). Informational badge reflecting the active data source.
Analysis Panel
- Re-ClassifyRe-Classify — Re-classify eventsRe-runs the AI arrhythmia classifier on the current session. Recomputes event labels and updates the findings list.
- Model statusModel status — Classifier model statusShows whether the on-device arrhythmia classifier model is loaded and ready. Informational — turns green when the model is ready.
Panels
- CloseClose — Close panelCloses the current flyout panel. Collapses the panel and restores the full-width view.
Export Panel
- Export as PDFExport as PDF — Export clinical reportGenerates a structured PDF with session info, findings and ECG event strips. Creates and downloads a PDF report.
- Export Raw CSVExport Raw CSV — Export raw CSVDownloads a CSV of session metadata for record keeping. Creates a small CSV with basic session fields.
- Export Trends CSVExport Trends CSV — Export trends CSVDownloads the longitudinal trends log as a CSV file (all sessions and checked metrics). If the Trends tab is not open, prompts to open it, then downloads session_trends.csv.
- Export Trends PDFExport Trends PDF — Export trends PDFDownloads the currently visible trends page as a structured PDF. Creates a PDF of the checked trend metrics (no sparkline).
Main Tabs
- DashboardDashboard — Dashboard summaryShows the session summary with narrative, physiology and analytics cards. Switches to the summary tab for the open session.
- ChartsChartsShows the interactive ECG chart with overlays and controls. Switches to the chart tab for detailed inspection.
- SleepSleep — Sleep analysisShows sleep-specific analysis and charts. Switches to the sleep tab when a session contains sleep data.
- MeditationMeditation — Meditation analysisShows meditation-specific analysis and playback. Switches to the meditation tab when a session contains meditation data.
- MetricsMetrics — Health MetricsShows all 98 health metrics with reliability grading badges and checkboxes for trends visibility. Switches to the metrics tab showing graded health metrics.
- TrendsTrends — Trends tabShows longitudinal trends across multiple sessions. Switches the main view to the Trends tab.
- HRVHRV — HRV analysisShows heart-rate-variability analysis for the current session. Switches the main view to the HRV tab.
- PDF PreviewPDF Preview — PDF report previewPreview of the generated PDF report before saving. Switches the main view to the report preview.
- Close tabClose tab — Close session tabCloses the current session tab and removes its content. Removes the tab and returns to the welcome screen.
Segment Bar
- AllAll — Full session overviewShows the full session in envelope mode. Displays the entire session at a glance with the ECG presence trace.
- Time segmentTime segment — 10-minute segmentJumps to the selected 10-minute segment and shows detailed ECG. Switches to the detailed ECG view for that time range.
- RESETRESET — Reset zoomResets the chart zoom to the current segment default. Restores the default visible range for the current segment.
- AUTO-YAUTO-Y — Auto Y-axisToggles automatic Y-axis scaling to the visible ECG amplitude. When on, the ECG vertical range adapts to the data in view.
- RAWRAW — Raw ECGToggles display of the raw ECG trace. Shows or hides the raw, unfiltered ECG waveform.
Activity Bar
- Walk(3)WalkJumps to the next Walk activity region in the session. Centres the chart on the next Walk occurrence and highlights the activity.
Event Bar
- PVC(3)PVCJumps to the next PVC event in the session. Centres the chart on the next PVC occurrence and highlights it.
Viz Bar
- ECGECG — ECG waveformThe raw electrical signal from the chest. Shows the P wave, QRS complex and T wave for each heartbeat. Toggles the green ECG trace on the chart.
- BPMBPM — Heart rate (BPM)Beat-to-beat heart rate calculated from R-R intervals. Toggles the red BPM overlay on the chart.
- HRVHRV — Heart rate variability (RMSSD)RMSSD trend derived from beat-to-beat interval variation. Toggles the green HRV overlay.
- MotionMotion — Motion (accelerometer)Accelerometer magnitude from the sensor. Tracks movement intensity and artefacts. Toggles the orange motion trace.
- EventsEvents — Arrhythmia eventsVertical markers for detected rhythm events such as PVC, PAC, Pause, Ectopic, AFIB. Toggles event highlight overlays and labels on the chart.
- ActivityActivity — Activity bandsColoured background bands showing classified activity states such as Sleeping, Walking, Gym. Toggles the activity overlay.
- BreathingBreathing — Breathing rateEstimated respiratory rate from ECG amplitude modulation or chest movement. Toggles the red-orange breathing rate overlay.
- Breath WaveBreath Wave — Breathing waveformFiltered respiratory signal showing individual inhale/exhale cycles. Toggles the blue breathing waveform overlay on the main chart.
- SmoothSmooth — Smooth ECGApplies a moving-average filter to reduce high-frequency noise and mains interference. Toggles smoothing on the ECG trace.
- PQRSTPQRST — PQRST markersAnnotation markers for P-wave onset, QRS complex and T-wave offset. Toggles the pink PQRST markers on the ECG trace.
- GridGrid — ECG calibration gridDraws standard ECG paper grid squares behind the trace. Toggles the grid overlay.
- SplitSplit — Split viewSwitches between overlay and split layout. In split mode each trace gets its own stacked panel.
- HUDHUD — Heads-up displayOpens a floating panel with real-time stats and a mini BPM sparkline. Toggles the HUD overlay.
- HoverHover — Hover labelsEnables crosshair-style labels with precise values for all visible series. Toggles detailed hover labels on the chart.
Chart HUD & Hover
- Drag handleDrag handle — Move HUDDrag bar at the top of the HUD panel. Repositions the HUD; the position is remembered for the session.
- CloseClose — Close HUDCloses the heads-up display panel. Hides the HUD; reopen it from the HUD viz toggle.
- PlayPlay — Play / pause playbackStarts or pauses chart playback. A cursor sweeps the chart showing live BPM and position.
- SpeedSpeed — Playback speedSets how fast the chart replays. 0.5x slows playback; 2x and 4x fast-forward.
- Resize gripResize grip — Resize HUDBottom-left corner grip of the HUD panel. Drag to change the HUD panel size.
- Drag handleDrag handle — Move hover panelDrag bar at the top of the hover readout panel. Repositions the panel on the chart.
- CloseClose — Close hover panelCloses the hover readout panel. Hides the panel; reopen it with the Hover viz toggle.
- Zoom readoutZoom readout — Visible rangeShows the time span currently visible on the chart. Updates as you zoom or pan the chart.
Summary Dashboard
- ▲Toggle — Toggle narrative summaryExpands or collapses the session narrative summary. Shows or hides the detailed narrative text.
- CopyCopy — Copy reportCopies the analysis report text to the clipboard. The report text is placed on the clipboard.
- PrintPrint — Print reportOpens a printable view of the analysis report. Launches the browser print dialog.
- ExpandExpand — Show all eventsExpands the apnea events list to show every detected episode. Toggles between the first 8 events and the full list.
Findings Queue
- ACCEPTACCEPT — Accept findingConfirms this detected event as correct. Marks the event accepted in the review queue.
- REJECTREJECT — Reject findingMarks this detected event as a false positive. Flags the event for removal in the re-classified CSV.
- UNDOUNDO — Undo reviewReverts an accept or reject decision on this event. Returns the event to the unreviewed state.
- VIEW ECGVIEW ECG — Jump to eventCentres the chart on this detected event. Opens the chart at the event's timestamp.
- Save CSVSave CSV — Save re-classified CSVSaves the session CSV with your reviewed event labels. Writes a _RC (re-classified) file to the phone and this PC.
Metrics Tab
- Check AllCheck All — Check all metricsMarks every metric for display in the Trends tab. All metric checkboxes are ticked.
- Uncheck AllUncheck All — Uncheck all metricsClears every metric selection. No metrics will appear in the Trends tab.
- Grade AGrade A — Grade A — Direct measurementShow only directly measured metrics (e.g. heart rate from R-R intervals). Filters the list to grade-A metrics.
- Grade BGrade B — Grade B — Validated estimationShow metrics estimated with validated methods. Filters the list to grade-B metrics.
- Grade CGrade C — Grade C — Trend-reliable onlyShow metrics that are only reliable as trends over time. Filters the list to grade-C metrics.
- Grade DGrade D — Grade D — ExperimentalShow experimental metrics still being validated. Filters the list to grade-D metrics.
- Checked onlyChecked only — Show checked metrics onlyLimits the list to metrics currently ticked for trends. Hides all unchecked metric cards.
- Show in trendsShow in trends — Include in TrendsControls whether this metric appears in the Trends tab. Checked metrics are plotted in the longitudinal trends.
Meditation Tab
- PlayPlay — Play / pause meditation playbackStarts or pauses the meditation session playback. Plays or pauses the guided breathing replay.
- Progress — Meditation progressScrub through the meditation session timeline. Moves the playback position to the selected time.
- Speed — Playback speedSets the meditation playback speed. Plays the session slower or faster.
Trends Tab
- Add SessionAdd Session — Add session to trendsAdds the current session metrics to the trends log. Appends the session data to the longitudinal trends dataset.
- ShowShow — Sessions per pageSets how many sessions appear on each trends page. Re-paginates the trends charts.
- Prev / NextPrev / Next — Trends pagesMoves between pages of trend data. Shows the previous or next set of sessions.
PDF Preview
- Save PDFSave PDF — Save reportDownloads the previewed report as a PDF file. Saves the PDF to your downloads folder.
- PrintPrint — Print reportSends the previewed report to the printer. Opens the browser print dialog.
- DiscardDiscard — Discard reportCloses the preview without saving. The generated report is discarded.
Dynamic buttons
- Walk(3)WalkJumps to the next Walk activity region in the session. Centres the chart on the next Walk occurrence and highlights the activity.
- PVC(3)PVCJumps to the next PVC event in the session. Centres the chart on the next PVC occurrence and highlights it.
🔗 Shared / General
13. Getting Sessions into the Dashboard
The dashboard connects to your phone over Wi-Fi and lets you choose whether to transfer sessions to this PC or stream them directly from the phone. You configure this in the Setup panel in the left sidebar.
Connecting to the Phone
Use this when your recorded sessions are still on the YourRhythm phone app. The phone app serves the dashboard directly to a PC, tablet, or Chromebook on the same Wi-Fi and supplies the complete address to use.
- Open YourRhythm on your phone.
- Tap the More tab and switch Wi-Fi Server ON in the CONNECTIONS card.
- Tap Dashboard URL, then tap Copy.
- Paste the copied URL into the browser on your PC, tablet, or Chromebook.
- Sessions appear automatically — the dashboard connects to the phone and lists your sessions in the sidebar. No setup panel configuration is needed.
Understanding the CSV File
Each exported session is a plain-text CSV file using Schema v7. It contains multiple sections with all your recording data:
| Section | Contains |
|---|---|
[SECTION:METADATA] |
Session identity & device info: report title, date, start time, duration, event counts, patient ID, age, sex, height, device ID, firmware, HR zone boundaries, rhythm diagnosis, CSV schema version, export scope |
[SECTION:HEALTH_METRICS] |
All 99 health metrics with values, units, reliability grades (A–D), and category labels. Includes heart rate, HRV, rhythm events, HR zones, respiratory, sleep, meditation, user profile, training load, and longitudinal trends. See Section 18 for details. |
[SECTION:ACTIVITY_REGIONS] |
Activity type regions with start/end times (Resting, Walking, Running, etc.) |
[SECTION:ANALYTICS] |
Rhythm tally, activity tally, BPM statistics, and sample counts |
[SECTION:EVENTS] |
All detected cardiac events with timestamps, types, feelings, and RR intervals |
[SECTION:BREATHING_EPOCHS] |
30-second breathing rate epochs with confidence scores and EDR/ACC fusion weights |
[SECTION:BREATHING_WAVEFORM] |
Filtered respiratory signal at 5 Hz showing individual breath cycles (sleep & meditation sessions) |
[SECTION:BREATH_CYCLES] |
Per-breath records with inhalation/exhalation duration and amplitude (sleep & meditation sessions) |
[SECTION:RAW_ECG] |
Full raw recording: ECG signal (130 Hz), BPM, RR intervals, accelerometer, breathing rate, activity labels, event markers, and noise flags. In Events Only mode, contains high-resolution ECG strips around each event. |
[SECTION:OVERVIEW_1HZ] |
Downsampled 1 Hz overview for fast loading (optional, included in some export modes) |
The exported file is a plain-text CSV — you can open it in any text editor (Notepad, TextEdit, VS Code, Excel) to see exactly what's inside. It contains no sensitive data: just your heart rate, ECG samples, activity labels, and detected events. There are no passwords, account details, or personal identifiers beyond the patient ID you set yourself. It's your data — keep it, share it, delete it, or analyse it in any tool you like.
- All Data — full raw ECG for deep analysis (larger file)
- Events Only — just the important moments (compact, fast to load)
Heart Rate Recovery in Exports
When you perform a Cool Down measurement on the phone, the result is written to the [SECTION:HEALTH_METRICS] section of the CSV:
- spot_hrr (%) — Relative recovery: ((peak HR − recovery HR) / peak HR) × 100.
- spot_hrr_start_bpm — The peak heart rate at the moment Cool Down was selected (or auto-triggered via Auto Cool Down Detect).
- spot_hrr_score — Composite score based on the raw BPM drop, age, fitness, and recovery velocity.
The dashboard reads these automatically and displays them in the Spot Measurements card on the Metrics tab.
Resting Heart Rate & HRV in Exports
When you perform an "HRV & RHR" measurement session on the phone, the resulting values are written to the [SECTION:HEALTH_METRICS] section of every subsequent export:
- spot_rhr (bpm) — Your baseline resting heart rate, used for Karvonen zone calculations.
- spot_hrv (ms) — Your RMSSD value from the 60-second measurement protocol.
The Cardio Dashboard reads these automatically and displays them in the Physiology card on the Summary tab. The status indicators show:
| Colour | RHR Meaning | HRV Meaning |
|---|---|---|
| Green | <60 bpm — Athletic | >50 ms — Excellent |
| Blue | 60-72 bpm — Good | 30-50 ms — Good |
| Amber | 73-80 bpm — Average | 20-30 ms — Fair |
| Red | >80 bpm — Elevated | <20 ms — Low |
Troubleshooting
| Problem | Cause | Solution |
|---|---|---|
| "Connection Failed" | Phone and PC not on same network | Check both are on the same Wi-Fi (not mobile data, not guest network) |
| "No Sessions Found" | No exported CSVs on phone | Record a session and export it first, or check Documents/YourRhythm-Data folder exists |
| "No Wi-Fi connection" on phone | Phone on mobile data only | Connect phone to Wi-Fi. The server needs a local network to work. |
| Phone IP keeps changing | Router assigns dynamic IPs | Check the Dashboard URL in the phone app's More tab (CONNECTIONS card) each time, or set a static IP on your phone/router |
| Can't connect at all | Network blocks device-to-device traffic | Some corporate/guest Wi-Fi blocks this. Use your home network instead. |
| CSV loads but shows no data | File may be an older format | Re-export the session from the phone app to get the latest format |
14. Heart Rate Zones
The dashboard and phone app divide your effort into 5 training zones based on your maximum heart rate. Zone data is sourced from the zone column in your CSV and displayed in the Zones card on the Summary tab, which shows the time spent in each zone as a proportion of the session.
Zone boundaries are calculated automatically from your age and resting HR using the Karvonen method, but can be manually adjusted in the phone app's Settings → Heart Rate Zones section.
For the full zone definitions, formula, and exercise physiology, see The Science → Training Zones.
15. Interpreting Your Results
Here's a plain-language guide to the terms you'll see in your session reports. For the full technical detail, see The Science page.
Common Arrhythmia Terms
| Term | What it means | Should I worry? |
|---|---|---|
| Normal Sinus Rhythm | Your heart is beating in a normal, regular pattern. | No — this is the expected result. |
| PVC (Premature Ventricular Contraction) | A beat starts early from the ventricles instead of the sinus node. It looks wide and bizarre on the ECG. | Occasional PVCs are common and usually benign. Frequent PVCs (>10% of beats) should be discussed with a doctor. |
| PAC (Premature Atrial Contraction) | A beat starts early from the atria. It looks normal in shape but arrives too soon. | Similar to PVCs — occasional PACs are common and usually harmless. |
| AFIB (Atrial Fibrillation) | The atria quiver instead of contracting normally. Detected when 5 or more consecutive heartbeats have irregular R-R intervals with no alternating pattern — distinguishing it from isolated ectopic beats (1–3 irregular) or bigeminy (alternating pattern). | AFIB is a significant finding. If detected, consult your doctor for a formal evaluation. |
| Bigeminy | Every normal beat is followed by a premature beat (e.g. N-PVC-N-PVC pattern). | Can be bothersome but is usually benign. If persistent or symptomatic, seek medical advice. |
| Trigeminy | Every two normal beats are followed by a premature beat (e.g. N-N-PVC pattern). | Similar to bigeminy — usually benign but worth monitoring. |
| VT (Ventricular Tachycardia) | A rapid, wide-complex rhythm originating in the ventricles. A medical emergency if sustained. | Seek immediate medical attention if sustained (>30 seconds). |
| Pause | A gap between beats longer than expected, often following a premature beat (compensatory pause). | Usually benign in the context of ectopic beats. Isolated pauses >3 seconds should be evaluated. |
| Apnea | A detected pause in breathing during sleep, inferred from HRV and heart rate patterns. | If frequent, consider a sleep study evaluation. |
| NOISE / ARTIFACT | The signal was too noisy to classify — caused by movement, poor contact, or interference. | Not a cardiac event. Try adjusting the strap or reducing movement. |
16. Help me make it better
The arrhythmia detection pipeline in Your Rhythm Studio is trained on open-access clinical ECG databases — but very little real-world ECG data exists for many arrhythmia types recorded from a Polar H10 chest strap. Most public datasets come from 12-lead clinical Holter monitors, not a single-lead consumer sensor. That gap matters: the more real Polar H10 recordings I can learn from, the better the detection gets for everyone.
If you felt something — a palpitation, a flutter, a missed beat — and the app didn't flag it, or if it flagged something you didn't feel, that's exactly the kind of case that helps me improve. You can submit a session for review directly from the phone app:
- Open the session in History → Session Detail.
- Tap the ⋮ menu → Submit for Review.
- Choose Missed Event (you felt it, app didn't catch it), False Alarm (app flagged it, you didn't feel it), or General (just sharing a session with events).
- Add an optional note and tap Submit.
The app generates a full CSV with your raw ECG and the detected events, and attaches it to an email pre-addressed to me. You can review the attachment before sending. No data is sent without your explicit action — nothing uploads automatically.
17. Contact
Email Address: YourRhythm101@gmail.com
Visit my website at YourRhythm.co.uk
18. Health Metrics & Reliability Grading
YourRhythm computes 99 health metrics across 15 categories. Each metric is assigned a reliability grade (A–D) so you know how much to trust each value. The Metrics tab (phone and web) shows every metric with its grade badge.
Using the Metrics Tab
The web dashboard's Metrics tab displays all 99 health metrics grouped by category, each with a coloured grade badge and a checkbox:
- Grade badge — the coloured circle (A green, B blue, C amber, D red) shows the reliability grade. Hover for the grade description.
- Checkbox — check a metric to make it appear in the Trends tab; uncheck to hide it. Unchecked metrics appear dimmed at 60% opacity.
- Check All / Uncheck All — bulk-toggle all 99 metrics at once. Useful for starting fresh or selecting everything.
- Value & unit — the right side of each card shows the metric's value with its unit (e.g.
62 bpm,45.2 ms).
Your checkbox selections are saved automatically and persist across sessions. The Trends tab shows only the metrics you've checked here — see Section 12: Trends Tab for the full trends workflow.
The Grading System
| Grade | Meaning | Examples |
|---|---|---|
| A | Direct measurement — exact inputs, validated formula, minimal error source. Trust the absolute value. | Session Duration, RHR, avg/min/max BPM, HR range, mean RR, RMSSD, SD1, SDNN, pNN50, CV, SD1/SD2 Ratio, %HRR, Total Heart Beats, spot RHR/HRV, HRR start BPM, bradycardia count, breathing confidence, samples, epochs, EDR/ACC weights, fusion stability, meditation duration/avg BPM/final RMSSD, breath pacing adherence, sleep HRV (RMSSD/SDNN/SD2/pNN50), BMI, BSA, BMI Category, RHR/HRV/HRR Trends |
| B | Validated estimation — derived from measured data with established algorithms. Absolute values are approximate; trends are reliable. | BMR, Frequency-domain HRV (Total/VLF/LF/HF Power, nLF, nHF, LF/HF Ratio), HRV Triangular Index, TINN, Baevsky SI, %HRmax, PVC Burden, PVC/hour, Ectopic Burden, Arrhythmia-Free Survival, ectopic/pause/bigeminy/trigeminy counts & burdens, HR Zones 1–5, TRIMP, ACWR, HRR %, HRR score, breathing rate (mean/min/max), Breathing Irregularity, I:E Ratio, Breathing Category, HRV Coherence, Resonance Frequency, sleep HRV trend slope, nocturnal HR dip, movement count |
| C | Trend-reliable only — the absolute value depends on assumptions or population averages. Track changes over time, not the number itself. | CTL, ATL, TSB (training load EWMA — sensitive to history window assumptions), AFIB/VT/apnea counts, AFIB burden %, AHI, apnea severity |
| D | Experimental — research-stage metric. Use with caution; interpretation may change as algorithms improve. | Sleep stage minutes (total, light, deep, REM, wake), sleep efficiency — estimated from HR/movement patterns, not polysomnography |
Key Principle: Trends vs Absolute Values
Grade B and C metrics are more reliable for tracking trends than for absolute values. For example, your LF/HF ratio might not be an exact number (it depends on resampling and windowing choices), but if it consistently rises over weeks during stress, that trend is meaningful. Always compare apples to apples: same activity type, same time of day, same measurement protocol.
Metric Categories
- Session — Session Duration (total recording length)
- Heart Rate — RHR, avg/min/max BPM, HR range, mean RR (basic heart rate statistics)
- HRV — RMSSD, SD1 (session-level HRV from spot measurement or sleep fallback)
- HRV Time Domain — SDNN, RMSSD, pNN50, CV (statistical properties of RR intervals)
- HRV Poincaré — SD1, SD2, SD1/SD2 Ratio (geometric analysis of beat-to-beat variability)
- HRV Frequency Domain — Total/VLF/LF/HF Power, nLF, nHF, LF/HF Ratio, HRV Triangular Index, TINN, Baevsky SI (spectral analysis via Welch's method)
- Heart Rate Intensity — %HRmax, %HRR, Total Heart Beats (effort and cardiac cost)
- Spot Measures — spot RHR, spot HRV, HRR %, HRR start BPM, HRR score (dedicated measurement protocols)
- Rhythm Events — ectopic, AFIB, VT, pause, bigeminy, trigeminy, bradycardia, apnea counts; ectopic total, ectopic/AFIB burden %, total rhythm events, user events
- Arrhythmia Burden — PVC Burden, PVC/hour, Ectopic Burden, Arrhythmia-Free Survival (derived burden metrics)
- HR Zones — Zone 1–5 time in minutes (time spent in each heart rate zone)
- Training Load — TRIMP, ACWR, CTL, ATL, TSB (Banister training impulse model)
- Respiratory — mean/min/max breathing rate, Breathing Irregularity Index, I:E Ratio, Breathing Category (EDR/ACC fusion)
- Data Quality — breathing confidence, total samples, breathing rate variability, total/high-quality epochs, EDR/ACC weights, fusion stability
- Meditation — duration, avg BPM, final RMSSD, HRV Coherence Ratio, Breath Pacing Adherence, Resonance Frequency
- Sleep — sleep HRV (RMSSD/SDNN/SD2/pNN50/trend slope), total/light/deep/REM/wake minutes, sleep efficiency, nocturnal HR dip, movement count, AHI, apnea severity, nocturnal RMSSD, nocturnal HR dipping
- User Profile — BMI, BMI Category, BMR, BSA (derived from your height, weight, age, sex)
- Longitudinal Trends — RHR Trend, HRV Trend, HRR Trend (7-day regression slopes)
For the mathematical methodology behind each metric, see The Science → Health Metrics Methodology.
Troubleshooting
If you're experiencing issues, you can download your error logs to help me diagnose the problem:
Logs are stored locally in your browser and include the last 10 sessions. Sensitive data (file paths, IPs, emails) is automatically redacted.