Your Rhythm Studio — Help & Reference
1. Quick Start Guide
New to Your Rhythm Studio? Here's how to record your first session in 5 steps:
- Put on the Polar H10 chest strap — moisten the electrode contacts and position it just below your chest muscles.
- Open the YourRhythm app — it auto-connects to your sensor and shows your live heart rate.
- Select an activity — tap the Activity dropdown (e.g. Resting, Walking, Running).
- Press START SESSION — the app begins recording ECG, heart rate, and detecting arrhythmias in real time.
- Press STOP when done — choose your export scope (Full Data or Events Only). The session is saved and ready to sync to the dashboard.
2. Recording a Session
The Monitor tab is where you start, stop, and manage live recordings.
Starting a Session
- Ensure the Polar H10 is connected (heart rate displayed on screen).
- Tap the Activity dropdown to select your activity type (e.g. Resting, Walking, Running, Gym).
- Press START SESSION. The ECG waveform and live metrics appear.
- Optional: Tap Flag Event at any time to log a symptom or feeling at the current moment.
Stopping a Session
- Press STOP SESSION. A confirmation dialog appears.
- Choose your export scope:
- Full Data — raw ECG + HR + all events (larger file, full analysis).
- Events Only — just detected anomalies with ECG snippets (compact, fast to load).
- Tap Confirm. The session is saved to the database and auto-exported.
Special Activity Modes
Certain activities trigger specialised measurement overlays automatically:
- HRV & RHR — starts a 60-second controlled measurement for resting HR and HRV. See Section 3.
- Cool Down — starts a 60-second heart rate recovery measurement. See Section 4.
- Meditation — opens the meditation duration and sound type picker. See Section 5.
- Sleeping — activates the sleep analysis pipeline (motion + HRV + respiratory rate).
3. Taking an HRV & RHR Measurement
Your morning HRV and resting heart rate are the most important baselines for tracking your cardiovascular health over time.
How to measure
- Put on the chest strap and open the app first thing in the morning, before getting out of bed or having coffee.
- Select the HRV & RHR activity from the Activity dropdown.
- A 60-second overlay appears with a countdown timer. Stay still and breathe normally.
- When the timer completes, your Resting HR and RMSSD (HRV) are saved automatically.
- These values are embedded in every subsequent session export and displayed in the dashboard's Settings panel.
For the science behind HRV, RMSSD, and why morning measurements matter, see The Science → HRV & RHR Baselines.
4. Measuring Heart Rate Recovery (Cool Down)
Heart Rate Recovery (HRR) shows how quickly your heart returns to baseline after exertion — a key indicator of cardiovascular fitness.
How to measure
- During or immediately after a hard effort (e.g. running, cycling), select the Cool Down activity from the Activity dropdown.
- The app records your current heart rate as your peak HR.
- A 60-second overlay appears with a countdown timer and live BPM display. Keep moving gently or stand still.
- When the timer completes, your recovery HR is recorded and the HRR percentage is calculated automatically.
- The result is saved in the session metadata and displayed in the dashboard's Spot Measurements card.
For the HRR formula and interpretation ranges, see The Science → Heart Rate Recovery.
5. Starting a Meditation Session
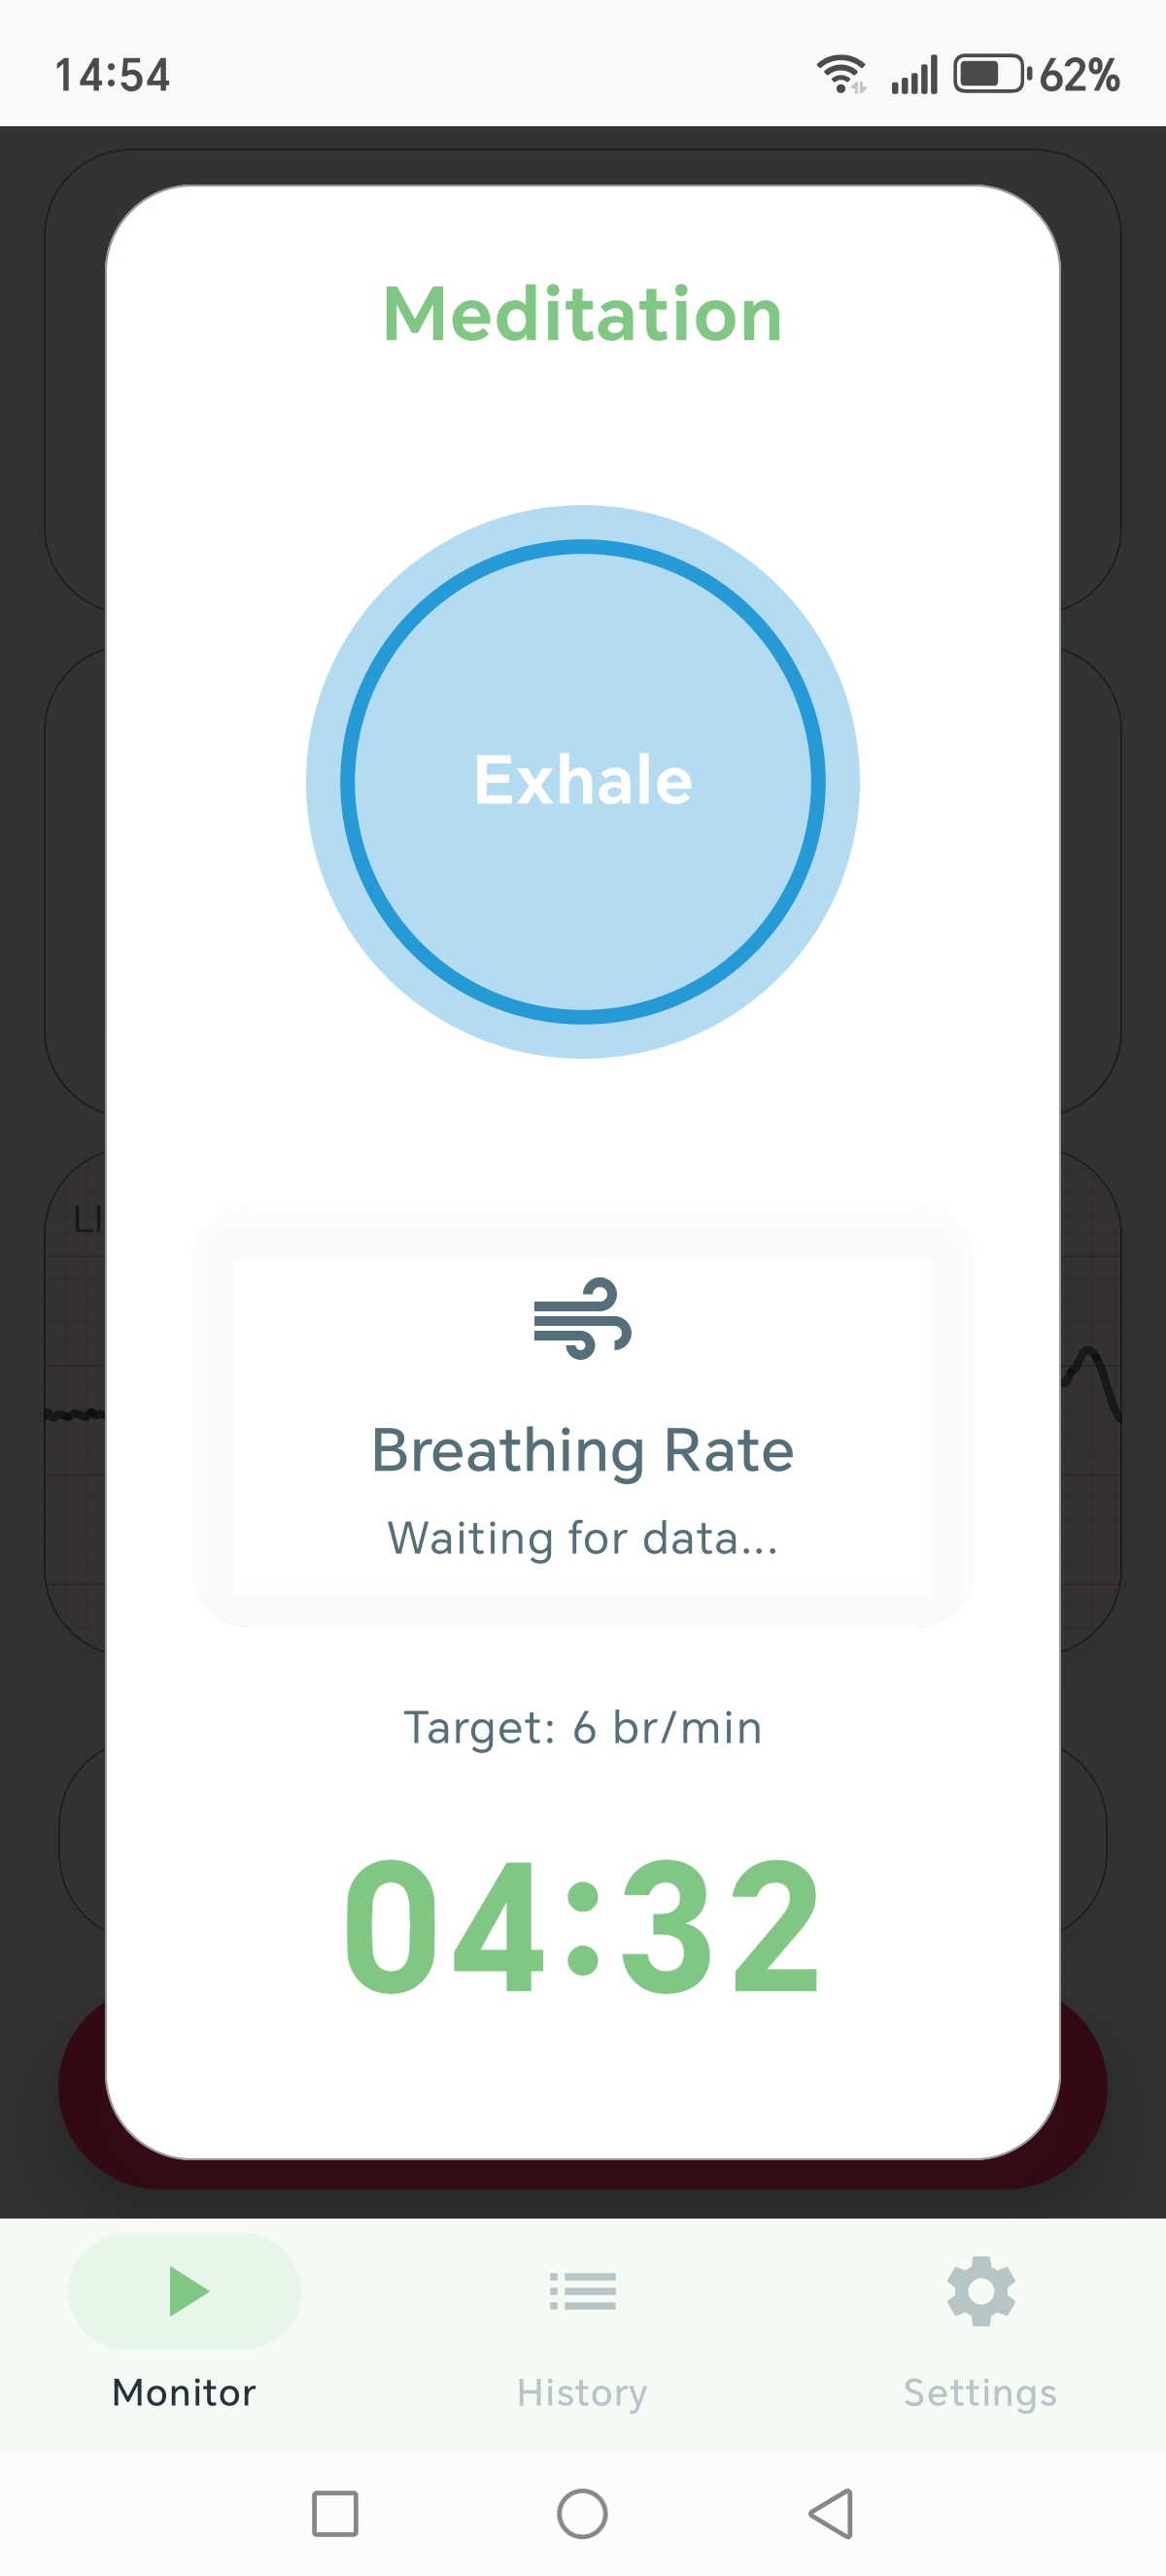
The Android app includes a guided meditation that uses your chest strap's accelerometer, heart rate, and beat-to-beat (RR) intervals to create a real-time audio feedback loop. The goal is to actively improve your HRV by guiding your breathing toward a resonance frequency of about 6 breaths per minute.
How to start
- Open the Android app and select the Meditation activity from the Activity dropdown.
- A duration picker appears with sound type chips. Choose a duration (5, 15, 30 minutes, or open-ended).
- Tap a sound mode to select it:
- Spatial Tone — fixed 5s in / 5s out breathing cycle with immersive stereo audio.
- Breath-Driven — audio pacer follows your actual chest movement from the accelerometer.
- HRV Coherence — a drone whose pitch shifts with your live HRV trend.
- Heartbeat — a low-frequency pulse timed to your actual heartbeat.
- Press Start. The breathing pacer circle appears with a countdown timer.
- During the session, tap the sound-type button at the top to switch modes at any time.
- Press Stop when done, or Abort to cancel without saving.
For the science behind biofeedback and coherence training, see The Science → Biofeedback & Coherence.
6. Getting Sessions into the Dashboard
All sessions are loaded from one source that you choose in the Setup panel: Phone or This PC. The source you select is remembered for next time.
Phone Source
Use this when your recorded sessions are still on the YourRhythm phone app.
On the Phone App
- Open YourRhythm — the Wi-Fi server starts automatically when the app launches.
- Go to Settings — scroll to the WI-FI SYNC card.
- Check the IP address — it will show something like
http://192.168.1.120:8080 - That's it! — you don't need to do anything else on the phone. Keep the app open.
On the Cardio Dashboard
- Open the Setup panel in the left sidebar.
- Select "Phone" as the session source.
- Choose your YourRhythm-Data folder on this PC — this is where downloaded sessions will be saved.
- Type the IP address shown on your phone and click
Connect. - Click Download from Phone — the dashboard copies every session to your PC and removes it from the phone.
- Open the Sessions panel — your sessions are loaded automatically.
PC Source
Use this when your sessions are already stored on your computer, for example after downloading them from the phone previously.
On the Cardio Dashboard
- Open the Setup panel in the left sidebar.
- Select "This PC" as the session source.
- Choose your YourRhythm-Data folder — the folder must be named exactly
YourRhythm-Data. - Click Load Sessions from PC, or simply open the Sessions panel — it loads automatically.
Understanding the CSV File
Each exported session contains multiple sections with all your recording data:
| Section | Contains |
|---|---|
[SECTION:METADATA] |
Session info: date, duration, device, patient ID, Resting HR, Measured HRV, sample rate |
[SECTION:EVENTS] |
All detected cardiac events with timestamps, types, feelings, and RR intervals |
[SECTION:EVENT_WINDOWS] |
Compact ECG strips around each event (for quick review without full raw data) |
[SECTION:RAW_ECG] |
Full raw recording: ECG signal, BPM, RR intervals, accelerometer, event markers |
- All Data — full raw ECG for deep analysis (larger file)
- Events Only — just the important moments (compact, fast to load)
Heart Rate Recovery in Exports
When you perform a Cool Down measurement on the phone, the result is embedded in the exported session metadata:
- Spot HRR (%) — Relative recovery: ((peak HR − recovery HR) / peak HR) × 100.
- Spot HRR Start BPM — The peak heart rate at the moment Cool Down was selected.
- Spot HRR Score — Composite score based on the raw BPM drop, age, fitness, and recovery velocity.
The dashboard reads these automatically and displays them in the Spot Measurements card.
Resting Heart Rate & HRV in Exports
When you perform an "HRV & RHR" measurement session on the phone, the resulting values are embedded in every subsequent export:
- Resting HR (bpm) — Your baseline resting heart rate, used for Karvonen zone calculations.
- Measured HRV (ms) — Your RMSSD value from the 60-second measurement protocol.
The Cardio Dashboard reads these automatically and displays them in the Settings panel under Physiology. The status indicators show:
| Colour | RHR Meaning | HRV Meaning |
|---|---|---|
| Green | <60 bpm — Athletic | >50 ms — Excellent |
| Blue | 60-72 bpm — Good | 30-50 ms — Good |
| Amber | 73-80 bpm — Average | 20-30 ms — Fair |
| Red | >80 bpm — Elevated | <20 ms — Low |
Troubleshooting
| Problem | Cause | Solution |
|---|---|---|
| "Connection Failed" | Phone and PC not on same network | Check both are on the same Wi-Fi (not mobile data, not guest network) |
| "No Sessions Found" | No exported CSVs on phone | Record a session and export it first, or check Documents/YourRhythm-Data folder exists |
| "No Wi-Fi connection" on phone | Phone on mobile data only | Connect phone to Wi-Fi. The server needs a local network to work. |
| Phone IP keeps changing | Router assigns dynamic IPs | Use Quick Scan to find the new IP, or set a static IP on your phone/router |
| Scan finds nothing | Network blocks device-to-device traffic | Some corporate/guest Wi-Fi blocks this. Use your home network or USB instead. |
| USB: phone not showing files | Phone locked or USB mode wrong | Unlock phone. In the USB notification, select "File Transfer / MTP" (not just charging) |
| CSV loads but shows no data | File may be an older format | Re-export the session from the phone app to get the latest format |
Folder Organization (Wi-Fi Downloads)
When sessions are downloaded via Wi-Fi, they can be automatically organized into folders:
- Flat — All files in one folder (simplest)
- Daily — Grouped by date (e.g.,
2026-04-11/IPM-26.04.11.csv) - Monthly — Grouped by month (e.g.,
2026-04/IPM-26.04.11.csv) - Yearly — Grouped by year (e.g.,
2026/IPM-26.04.11.csv) - Custom Pattern — Use variables to create your own structure
7. Reviewing a Session on the Dashboard
Once you've loaded a session into the Cardio Dashboard, here's how to explore and interpret the results:
Loading a Session
- Open the Sessions panel in the left sidebar.
- Click any session card to load it into the dashboard.
- The Summary tab opens first, showing key metrics: duration, event counts, HR stats, HRV, and the rhythm diagnosis.
Navigating the ECG
- Switch to the Charts tab to see the full ECG waveform.
- Use the segment toolbar at the top to jump between 10-minute segments (00:00, 10:00, 20:00…).
- Click zoom in / zoom out to change the time scale. The chart auto-switches between envelope view (zoomed out) and individual samples (zoomed in).
- Use the Event Navigation Bar on the right side to jump to detected events (see Section 9).
Reading the Summary
- The Rhythm Diagnosis card shows the overall classification (e.g. Normal Sinus Rhythm, AFIB Possible).
- The Conditions Detected list shows each arrhythmia type found, with counts and first/last occurrence times.
- Tap a condition name to see a plain-language description of that arrhythmia.
- Tap an anomaly item to open the ECG Event Viewer with the waveform snapshot.
Using the Viz-Bar Toggles
The vertical button bar on the right side of the chart lets you toggle overlays:
- BPM — heart rate trace
- HRV — HRV (RMSSD) trend
- Events — vertical markers for detected arrhythmias
- Activity — coloured background bands for activity types
- Zone — coloured HR zone band
- Grid — ECG calibration grid
For the full list of dashboard controls, see Section 14: UI Controls Reference.
8. Reading the ECG Chart
Trace Colours by Rhythm
| Colour | Label | Meaning |
|---|---|---|
| ■ | Normal | Normal sinus rhythm |
| ■ | AFIB | Atrial fibrillation — irregular R-R, absent P-waves |
| ■ | VT | Ventricular tachycardia |
| ■ | Ectopic | Premature beat (PVC or PAC) — wide or narrow, arrives early |
Overview Envelope
When viewing a full session or a 10-minute segment at full zoom-out, the chart switches from individual samples to an envelope view — a shaded band showing the signal's min/max range per time bin. This preserves performance for long recordings while still showing overall signal quality and events.
The envelope automatically switches back to individual ECG samples when you zoom in to less than ~2 minutes of data.
9. Event Navigation
The Event Navigation Bar appears at the right side of the segment toolbar. Each button corresponds to a detected or user-marked event in the session.
- Click once — Jumps to the first occurrence and zooms in to ~10 seconds of ECG
- Click again — Cycles to the next occurrence of the same event type
- After the last occurrence it wraps back to the first
10. Activity Tracking
Activity labels are sourced from the activity column in your recording CSV. Common values include: resting, walking, running, exercise, sleeping, driving, cooldown.
Activity regions appear as labelled, coloured panels in the Activity bar at the bottom of the chart. Toggle with the Activity button in the viz-bar.
Activity context is also used internally by the HRV engine — periods labelled with vigorous exercise will be classified as Active in the HRV trend even if the accelerometer is quiet (e.g., cycling).
11. Heart Rate Zones
The dashboard and phone app divide your effort into 5 training zones based on your maximum heart rate. Toggle the Zone button in the viz-bar to show the coloured zone band beneath the ECG. Zone data is sourced from the zone column in your CSV.
Zone boundaries are calculated automatically from your age and resting HR using the Karvonen method, but can be manually adjusted in the phone app's Settings → Heart Rate Zones section.
For the full zone definitions, formula, and exercise physiology, see The Science → Training Zones.
12. Interpreting Your Results
Here's a plain-language guide to the terms you'll see in your session reports. For the full technical detail, see The Science page.
Common Arrhythmia Terms
| Term | What it means | Should I worry? |
|---|---|---|
| Normal Sinus Rhythm | Your heart is beating in a normal, regular pattern. | No — this is the expected result. |
| PVC (Premature Ventricular Contraction) | A beat starts early from the ventricles instead of the sinus node. It looks wide and bizarre on the ECG. | Occasional PVCs are common and usually benign. Frequent PVCs (>10% of beats) should be discussed with a doctor. |
| PAC (Premature Atrial Contraction) | A beat starts early from the atria. It looks normal in shape but arrives too soon. | Similar to PVCs — occasional PACs are common and usually harmless. |
| AFIB (Atrial Fibrillation) | The atria quiver instead of contracting normally. Detected when 5 or more consecutive heartbeats have irregular R-R intervals with no alternating pattern — distinguishing it from isolated ectopic beats (1–3 irregular) or bigeminy (alternating pattern). | AFIB is a significant finding. If detected, consult your doctor for a formal evaluation. |
| Bigeminy | Every normal beat is followed by a premature beat (e.g. N-PVC-N-PVC pattern). | Can be bothersome but is usually benign. If persistent or symptomatic, seek medical advice. |
| Trigeminy | Every two normal beats are followed by a premature beat (e.g. N-N-PVC pattern). | Similar to bigeminy — usually benign but worth monitoring. |
| VT (Ventricular Tachycardia) | A rapid, wide-complex rhythm originating in the ventricles. A medical emergency if sustained. | Seek immediate medical attention if sustained (>30 seconds). |
| Pause | A gap between beats longer than expected, often following a premature beat (compensatory pause). | Usually benign in the context of ectopic beats. Isolated pauses >3 seconds should be evaluated. |
| Apnea | A detected pause in breathing during sleep, inferred from HRV and heart rate patterns. | If frequent, consider a sleep study evaluation. |
| NOISE / ARTIFACT | The signal was too noisy to classify — caused by movement, poor contact, or interference. | Not a cardiac event. Try adjusting the strap or reducing movement. |
13. Exporting from Dashboard
The Cardio Dashboard provides two export options in the Export sidebar panel for clinical reporting and basic data export.
Export as PDF (Clinical Report)
Generates a structured clinical report as a PDF document with three sections:
- Section 1: Session Information — Session name, date, duration, sample rate, number of events, patient ID
- Section 2: Clinical Findings Summary — Narrative summary from the dashboard Session Summary panel, showing detected arrhythmias and rhythm analysis
- Section 3: ECG Event Segments — ECG waveform strips (±5 seconds) around each detected event, with event type, timestamp, and RR interval
Export Raw CSV Data
Downloads basic session metadata as a simple CSV file. Contains:
- Session name
- Date
- Duration (minutes)
- Sample rate (Hz)
- Patient ID (if available)
- Device (if available)
- Start time (if available)
Append to Trends Log
Available in the Trends tab, this option appends the current session's key metrics to a trends CSV file for longitudinal tracking. Includes:
- Session identity (ID, date, duration)
- Heart rate statistics (min, max, average, range)
- HRV metrics (RMSSD, SDNN, PNN50, SD1, SD2)
- Rhythm event counts (Ectopic, AFIB, VT, Pause, Bigeminy, etc.)
- Zone minutes (Z1-Z5)
- Sleep metrics (if available)
- Respiratory rate (if available)
session_trends.csv file in your chosen folder. On a tablet or Chromebook, trends are stored in the browser's internal storage (OPFS). For consistent longitudinal tracking, stick to one device type for adding and reviewing trends. Use the Export button in the Trends tab to download a copy of your trends data.
14. UI Controls Reference
The interactive controls in the dashboard are grouped below. The list is generated from uiControls.json.
App Header
- A-A- — Small fontDecreases the application-wide font scale by 15%. All text becomes smaller for a denser layout.
- AA — Normal fontResets the application-wide font scale to the default size. Restores the standard font size and spacing.
- A+A+ — Large fontIncreases the application-wide font scale by 15%. All text becomes larger for improved readability.
- Theme — Toggle light/dark themeSwitches the dashboard between the light and dark colour schemes. The entire interface, chart and tooltips change theme.
Sidebar
- SetupSetup — Setup panelOpens the data-source setup panel to choose phone or PC and connect. Reveals the Setup flyout for phone connection and folder selection.
- SessionsSessions — Sessions panelOpens the sessions list with sort, filter and review options. Reveals the Sessions flyout and the session grid.
- AnalysisAnalysis — Analysis panelOpens the analysis panel for AI summaries, re-classification and independent analysis. Reveals the Analysis flyout with model controls and LLM settings.
- TipsTips — Toggle tooltipsTurns the hover tooltips on or off for dashboard controls. When active, tooltips appear on hover; when off, they are suppressed.
- HelpHelp — Help panelOpens the in-app help panel as a sidebar. Reveals the Help flyout containing the help page iframe.
- TrendsTrends — Trends tabOpens the longitudinal trends tab for multiple sessions. Switches the main view to the Trends tab for trend charts.
- ExportExport — Export panelOpens the export panel for PDF reports and raw CSV downloads. Reveals the Export flyout with PDF and CSV buttons.
- ScienceScience — Science pageOpens the science reference page in the same tab. Navigates to the science background page.
- AboutAbout — About pageOpens the about page in the same tab. Navigates to the about page.
- HelpHelp — Help pageOpens the standalone help page in the same tab. Navigates to help.html.
- HomeHome — Home pageOpens the home page in the same tab. Navigates to index.html.
Setup Panel
- Phone IP input — Phone IP addressEnter the IP address shown in the phone app's Server Info. Provides the address the dashboard uses to connect to the phone.
- ConnectConnect — Connect to phoneInitiates the Wi-Fi connection to the phone app. Lists available sessions on the phone and enables downloading.
- YesYes — Transfer to PCChooses to download sessions from the phone to this PC. Sessions are copied to YourRhythm-Data and removed from the phone.
- NoNo — Stream from phoneChooses to load sessions directly from the phone without copying. Sessions are loaded from the phone's storage over Wi-Fi.
- AcceptAccept — Accept setupConfirms the current setup and applies the data source. Applies the chosen source and closes the setup panel.
Sessions Panel
- ReloadReload — Reload sessionsRefreshes the session grid from the current source. Re-scans the selected folder or phone for sessions.
- Sort — Sort sessionsChoose the order in which session cards are displayed. Reorders the session grid by date, duration or event count.
- Filter — Filter sessionsLimits the session grid to sessions matching the selected criteria. Shows only all, phone, PC, sleep, non-sleep, with or without events.
- ✓Hide reviewedHide reviewed — Hide reviewed sessionsHides session cards that have already been marked reviewed. Reduces the grid to sessions that still need review.
Analysis Panel
- Plain SummaryPlain Summary — Plain language summaryGenerates a plain-language summary of the current session. Produces a narrative overview of rhythms, events and context.
- Re-ClassifyRe-Classify — Retrospective second opinionRe-analyzes the full ECG waveform with the same run-based AFIB detection as the phone, plus a morphology template scan that catches interpolated PVCs the phone's timing detector misses, an HRV-suppressed detector for concealed bigeminy, and TFLite model re-classification. Presents findings as accept/reject cards. Corrected CSV saves to this PC only — does not modify the original file on the phone.
- Independent AnalysisIndependent Analysis — Independent analysisRuns a second, independent analysis pass on the session. Provides a separate set of findings for comparison.
- ✓AI-Powered SummaryAI-Powered Summary — Enable AI-powered summaryToggles the use of an external LLM for summary generation. When enabled, summaries can be sent to a local or paid LLM.
- API Endpoint — LLM endpointURL of the LLM API, e.g. a local Ollama server. Sets where summary requests are sent.
- API Key — LLM API keyOptional API key for paid LLM services. Authenticated access to OpenAI or other paid endpoints.
- Model — LLM modelSelects which LLM model to use for summaries. Chooses the model name sent to the endpoint.
- Test ConnectionTest Connection — Test LLM connectionChecks whether the configured LLM endpoint is reachable. Sends a small request and reports success or failure.
Export Panel
- Export as PDFExport as PDF — Export clinical reportGenerates a structured PDF with session info, findings and ECG event strips. Creates and downloads a PDF report.
- Export Raw CSVExport Raw CSV — Export raw CSVDownloads a CSV of session metadata for record keeping. Creates a small CSV with basic session fields.
Main Tabs
- DashboardDashboard — Dashboard summaryShows the session summary with narrative, physiology and analytics cards. Switches to the summary tab for the open session.
- ChartsChartsShows the interactive ECG chart with overlays and controls. Switches to the chart tab for detailed inspection.
- SleepSleep — Sleep analysisShows sleep-specific analysis and charts. Switches to the sleep tab when a session contains sleep data.
- MeditationMeditation — Meditation analysisShows meditation-specific analysis and playback. Switches to the meditation tab when a session contains meditation data.
- Close tabClose tab — Close session tabCloses the current session tab and removes its content. Removes the tab and returns to the welcome screen.
Segment Bar
- AllAll — Full session overviewShows the full session in envelope mode. Displays the entire session at a glance with the ECG presence trace.
- Time segmentTime segment — 10-minute segmentJumps to the selected 10-minute segment and shows detailed ECG. Switches to the detailed ECG view for that time range.
- RESETRESET — Reset zoomResets the chart zoom to the current segment default. Restores the default visible range for the current segment.
- AUTO-YAUTO-Y — Auto Y-axisToggles automatic Y-axis scaling to the visible ECG amplitude. When on, the ECG vertical range adapts to the data in view.
- RAWRAW — Raw ECGToggles display of the raw ECG trace. Shows or hides the raw, unfiltered ECG waveform.
Activity Bar
- Walk(3)WalkJumps to the next Walk activity region in the session. Centres the chart on the next Walk occurrence and highlights the activity.
Event Bar
- PVC(3)PVCJumps to the next PVC event in the session. Centres the chart on the next PVC occurrence and highlights it.
Viz Bar
- ECGECG — ECG waveformThe raw electrical signal from the chest. Shows the P wave, QRS complex and T wave for each heartbeat. Toggles the green ECG trace on the chart.
- BPMBPM — Heart rate (BPM)Beat-to-beat heart rate calculated from R-R intervals. Toggles the red BPM overlay on the chart.
- HRVHRV — Heart rate variability (RMSSD)RMSSD trend derived from beat-to-beat interval variation. Toggles the green HRV overlay.
- MotionMotion — Motion (accelerometer)Accelerometer magnitude from the sensor. Tracks movement intensity and artefacts. Toggles the orange motion trace.
- EventsEvents — Arrhythmia eventsVertical markers for detected rhythm events such as PVC, PAC, Pause, Ectopic, AFIB. Toggles event highlight overlays and labels on the chart.
- ActivityActivity — Activity bandsColoured background bands showing classified activity states such as Sleeping, Walking, Gym. Toggles the activity overlay.
- BreathingBreathing — Breathing rateEstimated respiratory rate from ECG amplitude modulation or chest movement. Toggles the red-orange breathing rate overlay.
- SmoothSmooth — Smooth ECGApplies a moving-average filter to reduce high-frequency noise and mains interference. Toggles smoothing on the ECG trace.
- PQRSTPQRST — PQRST markersAnnotation markers for P-wave onset, QRS complex and T-wave offset. Toggles the pink PQRST markers on the ECG trace.
- GridGrid — ECG calibration gridDraws standard ECG paper grid squares behind the trace. Toggles the grid overlay.
- SplitSplit — Split viewSwitches between overlay and split layout. In split mode each trace gets its own stacked panel.
- HUDHUD — Heads-up displayOpens a floating panel with real-time stats and a mini BPM sparkline. Toggles the HUD overlay.
- HoverHover — Hover labelsEnables crosshair-style labels with precise values for all visible series. Toggles detailed hover labels on the chart.
Summary Dashboard
- ▲Toggle — Toggle narrative summaryExpands or collapses the session narrative summary. Shows or hides the detailed narrative text.
Meditation Tab
- PlayPlay — Play / pause meditation playbackStarts or pauses the meditation session playback. Plays or pauses the guided breathing replay.
- Progress — Meditation progressScrub through the meditation session timeline. Moves the playback position to the selected time.
- Speed — Playback speedSets the meditation playback speed. Plays the session slower or faster.
Trends Tab
- Add SessionAdd Session — Add session to trendsAdds the current session metrics to the trends log. Appends the session data to the longitudinal trends dataset.
Dynamic buttons
- Walk(3)WalkJumps to the next Walk activity region in the session. Centres the chart on the next Walk occurrence and highlights the activity.
- PVC(3)PVCJumps to the next PVC event in the session. Centres the chart on the next PVC occurrence and highlights it.
15. Phone App UI Reference
The interactive controls in the Your Rhythm Monitor Android app are grouped by screen below. The list is generated from phoneUiControls.json.
Monitor Tab — Session Controls
- START / STOP SESSIONSTART / STOP SESSION — Start / Stop Session ButtonBegins or ends a live ECG recording session. When starting, connects to the Polar H10 and begins streaming data. When stopping, shows a confirmation dialog with export scope options. Starts real-time ECG recording, heart rate monitoring, and arrhythmia detection. When stopping, saves the session to the database and optionally auto-exports.
- ActivityActivity — Activity SelectorOpens a dropdown menu to select the current activity type for the recording session. Sets the activity label for the current session, which is used for HRV validity, noise gating, and session organisation.
- Flag EventFlag Event — Flag Event ButtonOpens a dropdown menu to log a user-flagged event (symptom or feeling) at the current timestamp. Records a Uevent anomaly with the selected feeling label and captures an ECG snapshot.
Monitor Tab — Overlays & Dialogs
- Stop Session DialogStop Session Dialog — Stop Session ConfirmationDialog shown when stopping a session, with export scope choice (Full Data or Events Only) and confirm/cancel buttons. Choosing Full Data exports raw ECG + HR + events. Events Only exports just detected anomalies. Confirm stops and saves; Cancel continues recording.
- HRR MeasurementHRR Measurement — Heart Rate Recovery OverlayFull-screen overlay shown during the 60-second HRR measurement after selecting Cool Down activity. Displays countdown timer, start vs current BPM, and a live BPM chart. Abort button cancels the measurement.
- HRV MeasurementHRV Measurement — HRV & Resting HR OverlayFull-screen overlay shown during the 60-second HRV and RHR measurement after selecting HRV & RHR activity. Displays countdown timer and instructions to stay still. Abort button cancels the measurement.
- BLE StuckBLE Stuck — Bluetooth Connection Stuck DialogAlert dialog shown when the BLE GATT stack is corrupted and cannot recover automatically. Offers to open Android Bluetooth Settings to toggle BLE off/on, or dismiss the warning.
- ProcessingProcessing — Session Processing OverlayFull-screen overlay with spinner shown briefly while session data is being saved after stopping. Blocks interaction until session processing and database writes are complete.
Monitor Tab — Meditation Overlay
- Meditation DurationMeditation Duration — Meditation Duration PickerOverlay shown when the Meditation activity is selected, offering sound type selection and duration choices. Lets the user choose a sound feedback type (Spatial, Breath, HRV, Heartbeat) and a session duration (5, 15, 30 minutes, or open-ended).
- Sound TypeSound Type — Meditation Sound Type SelectorFilter chips to select the audio feedback mode during meditation: Spatial Tone, Breath Driven, HRV Coherence, or Heartbeat. Changes the real-time audio feedback loop used to guide breathing toward ~6 breaths per minute.
- Meditation SessionMeditation Session — Active Meditation SessionFull-screen overlay with animated breathing pacer circle, live breathing rate, countdown timer, and heart rate display. Guides the user through paced breathing with real-time audio and visual feedback. Stop button ends the session; Abort cancels without saving.
Settings — User Profile
- AgeAge — Age InputNumeric text field for the user's age, used to calculate maximum heart rate and training zones. Auto-saves on change. Recalculates HR zone defaults if age changes.
- WeightWeight — Weight InputNumeric text field for the user's weight in kilograms. Auto-saves on change with a 500ms debounce.
- Resting HRResting HR — Resting Heart Rate InputNumeric text field for manual entry of resting heart rate. Auto-measured when running the HRV & RHR activity. Auto-saves on change. Used for HR zone calculation and HRV analysis context.
- SexSex — Sex SelectorFilter chips to select Male or Female for the user's biological sex. Auto-saves instantly on selection.
Settings — Sensor Configuration
- Sensor IDSensor ID — Polar Sensor ID InputText field for entering the Polar H10 device ID manually, or it is auto-filled when a sensor is selected from scan results. Auto-saves on change. Used to connect to the sensor on app launch.
- SCAN FOR SENSORSSCAN FOR SENSORS — Scan / Stop Scan ButtonStarts a Bluetooth scan for nearby Polar devices. Toggles to STOP SCANNING while active. Populates a list of discovered sensors. Tap a result to select it as the active sensor.
- Sensor ResultSensor Result — Scanned Sensor ItemTap a discovered sensor from the scan results list to set it as the active sensor. Saves the sensor ID and name for auto-connect on next app launch.
Settings — Heart Rate Zones
- Max HR OverrideMax HR Override — Max HR Override InputNumeric text field to manually override the age-calculated maximum heart rate. Set to 0 to use the automatic calculation. Auto-saves on change. All 5 zone boundaries recalculate based on this value and resting HR.
- Zone BPMZone BPM — Zone Boundary Inputs (Z1–Z5)Ten numeric text fields defining the min/max BPM boundaries for each of the 5 heart rate zones. Auto-saves when any zone value differs from the defaults. Used for live zone display and post-session analysis.
- High HR ThresholdHigh HR Threshold — High Heart Rate ThresholdNumeric text field for the upper heart rate alert threshold in BPM. Triggers a warning if heart rate exceeds this value during a session.
- Low HR ThresholdLow HR Threshold — Low Heart Rate ThresholdNumeric text field for the lower heart rate alert threshold in BPM. Triggers a warning if heart rate drops below this value during a session.
Settings — Event Recording
- Always Record EventsAlways Record Events — Always Record Events SwitchToggle switch that controls arrhythmia detection sensitivity. When ON, records all detected cardiac events at maximum sensitivity, even during high-motion activities. When OFF, events are filtered during noisy or high-activity windows to reduce false positives. Changes the AI sensitivity factor from 2.8x (OFF) to 1.5x (ON), catching more potential anomalies.
- Forgot to Record WarningForgot to Record Warning — Forgot to Record Warning SwitchToggle switch that vibrates 3 quick pings if connected to a sensor for 30 seconds without starting a session. Enables or disables the reminder vibration when idle but connected.
Settings — Appearance
- Night ModeNight Mode — Night Mode SwitchToggle switch between day (light) and night (dark) themes. Immediately switches the app's colour scheme.
Settings — Custom Activities
- Add ActivityAdd Activity — Add Custom ActivityText field and Add button to create a new custom activity type for the activity selector dropdown. Adds the new activity to the user activities list and makes it available in the Monitor tab dropdown.
- Remove ActivityRemove Activity — Remove Custom ActivityTap the X icon next to a custom activity to remove it from the list. Removes the activity from the user activities list and Monitor tab dropdown.
Settings — Custom Feelings
- Add FeelingAdd Feeling — Add Custom Feeling / SymptomText field and Add button to create a new custom feeling or symptom for the Flag Event dropdown. Adds the new feeling to the user feelings list and makes it available in the Monitor tab Flag Event menu.
- Remove FeelingRemove Feeling — Remove Custom FeelingTap the X icon next to a custom feeling to remove it from the list. Removes the feeling from the user feelings list and Flag Event menu.
Settings — Export
- Export ScopeExport Scope — Export Scope ChipsFilter chips to select whether session exports include All Data (raw HR + ECG + events) or Events Only (just detected anomalies). Controls the default export scope for auto-export on session stop and manual exports.
Settings — Diagnostics
- EXPORT / SHARE DEBUG LOGEXPORT / SHARE DEBUG LOG — Export Debug Log ButtonExports the app's debug log file to Documents and offers to share it via Android share sheet. Copies the persistent debug log to external storage and opens the share dialog.
- EXPORT DATABASEEXPORT DATABASE — Export Database ButtonExports the app's SQLite database to Documents/YourRhythm-Data for external analysis. Copies the full database file to external storage accessible via USB/MTP.
- CLEAR LOGCLEAR LOG — Clear Debug Log ButtonOutlined button that clears the persistent debug log file. Empties the debug log file in the app's private storage.
History — Session List
- Month HeaderMonth Header — Expandable Month HeaderTap to expand or collapse all weeks within a month, showing session counts. Toggles the visibility of week groups within that month.
- Week HeaderWeek Header — Expandable Week HeaderTap to expand or collapse all sessions within a week. Toggles the visibility of individual session cards within that week.
- Session CardSession Card — Session ItemTap a session card to open the Session Report. Swipe right to reveal the delete confirmation dialog. Opens the Session Detail Screen with full analysis, or prompts to delete the session.
- Delete SessionDelete Session — Delete Session DialogConfirmation dialog shown when swiping a session card. Delete permanently removes the session and all its events. Deletes the session and all associated anomalies from the database.
Session Report — Header & Overflow
- BackBack — Back ButtonReturns to the History screen. Navigates back to the session list.
- More OptionsMore Options — Overflow Menu (⋮)Dropdown menu with Share Session Report and Delete Session options. Opens the share format dialog or delete confirmation dialog.
- Share Session ReportShare Session Report — Share Format DialogDialog to choose export format: CSV (raw data + events) or PDF (formatted report). Includes radio buttons and Share/Cancel buttons. Generates the selected format and opens the Android share sheet with the file.
- Delete SessionDelete Session — Delete Session DialogConfirmation dialog to permanently delete the session and all its data. Deletes the session from the database and returns to History.
Session Report — Analysis & Events
- Run Full AnalysisRun Full Analysis — Run Full Analysis ButtonButton that triggers rhythm classification, HRV analysis, Poincaré plot, and tachogram generation for the session. Runs the full analysis pipeline and populates the rhythm diagnosis, conditions detected, and charts.
- Anomaly ItemAnomaly Item — Anomaly / Event ItemTap an anomaly in the Conditions Detected list to open the ECG Event Viewer for that event. Opens the full-screen ECG snapshot viewer with the event's waveform and classification.
- Condition InfoCondition Info — Condition Description PopupTap a detected condition name to see a plain-language description of that arrhythmia. Opens an AlertDialog with the condition title and description text.
ECG Event Viewer
- BackBack — Back ButtonCloses the ECG Event Viewer and returns to the Session Report. Dismisses the viewer dialog.
- DeleteDelete — Delete Event ButtonDeletes the currently displayed anomaly/event from the database. Removes the anomaly and closes the viewer.
- PREVIOUSPREVIOUS — Previous Event ButtonNavigates to the previous ECG snapshot in the session's event carousel. Loads the preceding anomaly's ECG waveform and metadata.
- NEXTNEXT — Next Event ButtonNavigates to the next ECG snapshot in the session's event carousel. Loads the following anomaly's ECG waveform and metadata.
- Pinch / PanPinch / Pan — Pinch-to-Zoom & Pan GestureTwo-finger pinch to zoom and single-finger drag to pan the ECG waveform within the viewer. Scales the waveform between 0.5x and 10x and pans horizontally/vertically.
- Feeling ChipFeeling Chip — Feeling Annotation ChipsTappable chips to annotate a user-flagged event with a feeling label (e.g. Chest Pain, Palpitations). Only shown for Uevent types. Updates the anomaly type to 'Uevent:
' and saves to database.
Onboarding
- NextNext — Next ButtonAdvances to the next onboarding page (Welcome, Wear Your Sensor, Connect & Record). Shows the next page with its icon, title, and description.
- SkipSkip — Skip ButtonSkips the onboarding flow and proceeds directly to the app. Calls onFinish to exit onboarding.
- Get StartedGet Started — Get Started ButtonFinal onboarding button that exits the onboarding flow and enters the main app. Calls onFinish to complete onboarding.
16. Contact
For questions, support, or feedback, please contact us at: YourRhythm101@gmail.com
Visit our website at YourRhythm.co.uk
Troubleshooting
If you're experiencing issues, you can download your error logs to help us diagnose the problem:
Logs are stored locally in your browser and include the last 10 sessions. Sensitive data (file paths, IPs, emails) is automatically redacted.